
# Migrate to XCP-ng
If you are using another virtualization platform (VMware, KVM, etc.), this part of the documentation will help you to migrate to XCP-ng.
WARNING
OVA import will miss the information if the VM is running BIOS or UEFI mode. Double check your settings on your original system, and then enable (or not) UEFI on XCP-ng side for the destination VM. You can do so in VM advanced tab in Xen Orchestra.
# From XenServer
We got a dedicated section on how to migrate from XenServer to XCP-ng.
# From Citrix Hypervisor
We got a dedicated section on how to migrate from Citrix Hypervisor to XCP-ng.
# From Xen on Linux
If you are running Xen on your usual distro (Debian, Ubuntu…), you are using xl to manage your VMs, and also plain text configuration files. You can migrate to an existing XCP-ng host thanks to this Python script (opens new window).
- Get that script in your current
dom0. - Shutdown your VM
- Run the script, VM by VM with for example:
./xva.py -c /etc/xen/vm1.cfg -n vm1 -s xcp_host_1 --username=root --password="mypassword" --no-ssl. You can use a hostname or the IP address of your XCP-ng host (namexcp_host_1here) - Your disks are streamed while the configuration file is "translated" to a VM object in your XCP-ng host.
- As soon it's done, you should be able to boot your VM on destination
- Repeat for all your VMs
If you have an error telling you that you don't have an default SR, please choose a default SR on your XCP-ng pool (in XO, Home/Storage, hover on the storage you want to put by default, there's an icon for it).
WARNING
This script is a bit old and not tested since while. If you have issues, feel free to report that!
# From Virtualbox
Export your VM in OVA format, and use Xen Orchestra to import it. If you have an issue on VM boot, check the VMware section.
# From VMware
Using OVA export from VMware and then OVA import into Xen Orchestra is the preferred way.
TIP
Collect info about network cards used in windows VM (ipconfig /all) use same mac address(es) when creating interfaces in xcp-ng this step will help You skip windows activation if system was activated already.
Importing a VMware Linux VM, you may encounter an error similar to this on boot:
dracut-initqueue[227]: Warning: /dev/mapper/ol-root does not exist
The fix for this is installing some xen drivers before exporting the VM from VMware:
dracut --add-drivers "xen-blkfront xen-netfront" --force
See here (opens new window) for more details. Once the imported VM is properly booted, remove any VMware related tooling and be sure to install Xen guest tools.
# From Hyper-V
- Remove Hyper-V tools from every VM if installed.
- Install an NFS Server somewhere. (You can also use Win-scp directly from Hyper-V and copy "$uuidger -r".vhd directly to storage and rescan after that)
- Create an NFS share on that server.
- Mount the NFS share as a Storage Repository in XenCenter or XOA.
- Make sure the hyper-v virtual disk is not fixed type, use hyper-v mgmt to convert to dynamic vhd if needed.
- Copy the VHD file you want to import to the NFS share. -use uuidgen -r to generate uuid and use it to rename vhd file.
- Create a new VM in xcp-ng with no disks.
- Attach the VHD from the NFS share to your new VM.
- Install Xenserver Tools.
- If everything work well move virtual disk using XCP-ng center from temporary storage to dedicated storage on the fly, VM can be turned on and disk can be online.
TIP
If You lost ability to extend migrated volume (opening journal failed: -2) You need to move disk to another storage, VM should be ON during moving process. This issue can occur when vhd files was directly copied to storage folder.
# From KVM (Libvirt)
Related forum thread: https://xcp-ng.org/forum/topic/1465/migrating-from-kvm-to-xcp-ng (opens new window)
Due the fact I have only server here, I have setup a "buffer" machine on my desktop to backup and convert the VM image file.
Install the dracut packages : yum install dracut-config-generic dracut-network
dracut --add-drivers xen-blkfront -f /boot/initramfs-$(uname -r).img $(uname -r)If your VMs are in BIOS mode :
dracut --regenerate-all -f && grub2-mkconfig -o /boot/grub2/grub.cfgIf your VMs are in UEFI mode (OVMF Tianocore) :
dracut --regenerate-all -f && grub2-mkconfig -o /boot/efi/EFI/<your distribution>/grub.cfgShutdown the VM
Use rsync to copy VM files to the "buffer" machine using
--sparseflag.Convert the QCOW2 to VHD using QEMU-IMG :
qemu-img convert -O vpc myvm.qcow2 myvm.vhdUse rsync to copy the converted files (VHD) to your XCP-ng host.
After the rsync operation, the VHD are not valid for the XAPI, so repair them :
vhd-util repair -n myvm.vhdvhd-util check -n myvm.vhdshould returnmyvm.vhd is validFor each VM, create a VDI on Xen Orchestra with the virtual size of your VHD + 1GB (i.e the virtual size of myvm is 21GB, so I create a VDI with a size of 22GB).
Get the UUID of the VDI (on Xen Orchestra or CLI) and use the CLI on the XCP-ng host to import the VHD content into the VDI :
xe vdi-import filename=myvm.vhd format=vhd --progress uuid=<VDI UUID>Once the import is done, create a virtual machine using XO or XCP-ng Center, delete the VM disk that has been created and attach your newly created VDI to the VM. Don't forget to set the VM boot mode to UEFI if your VMs was in UEFI mode.
Boot the VM and find a way to enter in the virtual UEFI of the VM. Here, I type the Escape and F9,F10,F11,F12 keys like crazy. Select Boot Manager, you should see this window :
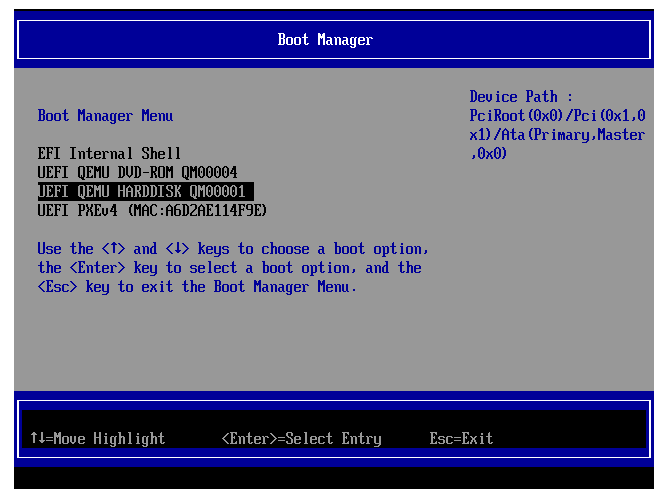
Select
UEFI QEMU HARDDISK, the screen should be black for seconds and you should see the GRUB. Let the machine worked for minutes and you should see the prompt finally 👍Install Guest Tools and reboot. The reboot shouldn't take long, you don't have to redo step 13, the OS seems to have repair the boot sequence by itself.
Done !