
Using Packer with XCP-ng
Having a tool to orchestrate automatically your application is great: it's called Terraform, and our provider for Xen Orchestra API is now finally hosted in our public Github organization:
 vatesfr
As a reminder, you can read some examples here:
 Dom Del Nano
But how about getting always up-to-date templates that you will use then with Terraform? A cool solution called Packer!
Context
Let's talk about Packer first: it is a tool that automates the creation of consistent machine images for different platforms. Its goal in infrastructure is to enable the reliable and reproducible generation of machine images, promoting consistency and reducing manual intervention.
By defining configurations in a declarative HCL syntax, Packer supports the concept of Infrastructure as Code (IaC), ensuring that the deployment process remains standardized across various environments, such as virtual machines, containers, or cloud instances. This automation enhances the efficiency of managing infrastructure, minimizes configuration drift, and facilitates a more streamlined and scalable deployment process.
In other words, using Packer in an XCP-ng infrastructure allows you to create your custom template suiting your needs, while keeping them up to date in a predictable fashion!
Packer 101: a real example
Let's explore how you can use it with a real use example! We'll prepare a Debian 12 template, ready to use with Cloudinit support and our latest Rust guest tools.
Installing Packer
Before anything else, you need to install Packer first: to do this, you can check directly the official packer documentation. If you are on Ubuntu/Debian, it's done in few lines:
curl -fsSL https://apt.releases.hashicorp.com/gpg | sudo apt-key add -
sudo apt-add-repository "deb [arch=amd64] https://apt.releases.hashicorp.com $(lsb_release -cs) main"
sudo apt-get update && sudo apt-get install packer
Now you can check if it works by entering packer in your shell. You should see:
 packer
Usage: packer [--version] [--help] <command> [<args>]

Available commands are:
    build           build image(s) from template
    console         creates a console for testing variable interpolation
    fix             fixes templates from old versions of packer
    fmt             Rewrites HCL2 config files to canonical format
    hcl2_upgrade    transform a JSON template into an HCL2 configuration
    init            Install missing plugins or upgrade plugins
    inspect         see components of a template
    validate        check that a template is valid
    version         Prints the Packer version
Your packer file
With Packer installed, you can create your first packer file. Create a new file, with the extension .pkr.hcl at the end. For example here, we called it debian12.pkr.hcl, because we'll use this file to create a… Debian 12 template!
Declare the plugin to use
So, let's declare the fact that you need to use this very XCP-ng/XenServer Packer plugin:
packer {
  required_plugins {
   xenserver= {
      version = ">= v0.7.0"
      source = "github.com/ddelnano/xenserver"
    }
  }
}
Save your file, and do a packer init. The output should look like this:
Installed plugin github.com/ddelnano/xenserver v0.7.0 in "/home/user/.packer.d/plugins/github.com/ddelnano/xenserver/packer-plugin-xenserver_v0.7.0_x5.0_linux_amd64"XCP-ng host & storage information
Now, we need to tell the plugin how to connect to your host. Add this to your file:
variable "remote_host" {
  type        = string
  description = "The ip or fqdn of your XCP-ng. It must be the master"
  sensitive   = true
  default     = "10.10.1.66"
}

variable "remote_username" {
  type        = string
  description = "The username used to interact with your XCP-ng"
  sensitive   = true
  default     = "root"
}

variable "remote_password" {
  type        = string
  description = "The password used to interact with your XCP-ng"
  sensitive   = true
  default     = "P@ssw0rd"
}

variable "sr_iso_name" {
  type        = string
  description = "The ISO-SR to packer will use"
  default     = "ISO Repository"
}

variable "sr_name" {
  type        = string
  description = "The name of the SR to packer will use"
  default     = "Local storage"
}
It's pretty self explanatory: we'll tell Packer to access your master host, and rely on a target Storage Repository for VM disk and the ISO repository to mount the Debian ISO inside the VM.
Configure your VM
Now, we can configure our VM. We'll go step by step, but all the content you see must be in the same file that we provided in a Gist.
ISO and boot commands
source "xenserver-iso" "debian12" {
  iso_checksum      = "013f5b44670d81280b5b1bc02455842b250df2f0c6763398feb69af1a805a14f"
  iso_url           = "https://cdimage.debian.org/debian-cd/current/amd64/iso-cd/debian-12.5.0-amd64-netinst.iso"

  sr_iso_name    = var.sr_iso_name
  sr_name        = var.sr_name
  tools_iso_name = ""

  remote_host     = var.remote_host
  remote_password = var.remote_password
  remote_username = var.remote_username

  http_directory = "http"
  ip_getter = "tools"

  boot_command =  [
        "<wait><wait><wait><esc><wait><wait><wait>",
        "/install.amd/vmlinuz ",
        "initrd=/install.amd/initrd.gz ",
        "auto=true ",
        "domain= ",
        "url=http://{{.HTTPIP}}:{{.HTTPPort}}/preseed.cfg ",
        "hostname=debian ",
        "interface=auto ",
        "vga=788 noprompt quiet--- <enter>"
  ]
First, we configure the ISO packer will be using to install the VM, and the checksum. Then, we're passing the storage repository variables we configured earlier. Also, leave the tools_iso_name variable empty, since we'll install the tools via the preseed configuration file.
Next, we tell packer where the preseed file is stored with the http_directory variable. In our case, we created a directory called http next to our packer file, and placed the preseed file in here. Packer will automatically spawn a temporary HTTP server to allow the VM to fetch the file.
And then, we tell Packer to get the VM IP address from the guest tools, not via the http server with the variable ip_getter.
After that, we'll work on the boot command. The boot command is sent by Packer at the start of your VM, injecting all the needed information to access the preseed file and other settings. You can obviously change the domain and the hostname. The url variable is filled by packer, with the HTTP server packer will spawn when the build start.
  clone_template = "Debian Bookwork 12.0"
  vm_name        = "Debian 12 template"
  vm_description = "My first template with packer"
  vcpus_max	 = 2
  vcpus_atstartup = 2
  vm_memory      = 2048 #MB
  network_names = ["Private Lab"]
  disk_size      = 20480 #MB
  disk_name      = "debian disk"
  vm_tags        = ["Generated by Packer"]
Now, we'll configure the parameters of our VM.
For the clone_template variable, the template must exist on your XCP-ng hosts. Here, it's configured with the network_names, but you can remove it, and packer will use the management network by default.
Post-install configuration
This provider requires connecting to the VM post reboot to validate the completion before exporting. Configure the ssh_username and the ssh_password like configured in your preseed file.
  ssh_username            = "debian"
  ssh_password            = "debian"
  ssh_wait_timeout        = "60000s"
  ssh_handshake_attempts  = 10000

  output_directory = "packer-debian-12"
  keep_vm          = "never"
  format = "xva_compressed"
}
By default, Packer will export a template. If you need to export a full VM (for example, to reuse or deploy it elsewhere directly), you can add the skip_set_template = true variable.
Add at the end of the file, don't forget to tell Packer to build using the section source "xenserver-iso" "debian12" we wrote earlier:
build {
  sources = ["xenserver-iso.debian12"]
}
And you're all set!
Starting the build
You can launch the build with the command packer build debian12.pkr.hcl. In this example, a Debian12 build takes about 10 minutes.
You will end with the XVA file ready on your own machine, where you started to build. And yes, Packer will download the VM automatically when the build is finished! Also, on XCP-ng side, the template is immediately ready.
Resources
The entire Packer file example is available here:
262588213843476
And the preseed example file for Debian 12:
262588213843476The provider official documentation is available here:
ddelnano
A big thanks to Cécile who wrote this tutorial! Let's switch on how you can use it now and what's next for our Packer provider.
Also, another special thanks to Dom, who is maintaining this Packer provider!
XO Hub
This example was directly took from our new Debian 12 template available in the XO Hub:
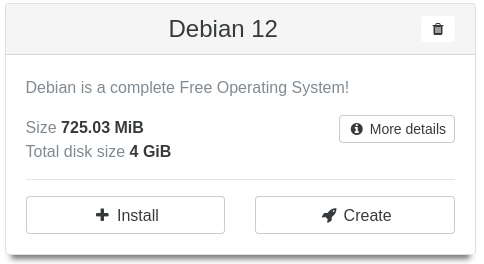
If you want to play with it, just go in your XOA menu, "Hub", then enjoy a Cloud-init ready template directly!
Looking ahead for our Packer provider
Currently, our Packer provider isn't fully aligned with our branding nor hosted in the ideal repository. This year, we're setting our sights on transforming this. Our aim is to streamline our ecosystem within the Vates repository, bringing together the Terraform provider, an potentially upcoming Pulumi provider, and more, under one roof.
Furthermore, we're excited to announce plans for a new Packer provider designed for direct compatibility with our XO API. This move will foster a unified ecosystem, leveraging a centralized API for enhanced synergy across our tools.
Stay tuned for a year of integration and innovation!