Cloudbase-init on Windows
-
By the way, how to edit Template ?
-
Didn't bother with manual sysprep anymore. I just let the installer start it.
-
You don't. Pretty sure there is a dialog stating this is not reversable when setting a VM as a template.
What I do is have a source vm and then take a snapshot of it while off. Then create a vm off that snap. Can do versioning this way. Boot the new vm (from the snap), install cloudbase, copy over the cloudbase-init.conf over, shutdown, convert to template.
I also created my own ISO with the citrix tools, cloudbase installer, and cloudbase config to make it easier.
Making the hostname update was probably the first thing that got working. Check my cloud-config at the top. That should work. Just be sure to add those last three lines to the cloudbase config too.
And the only file i change is cloudbase-init.conf.
-
@jkatz Thanks for that.
I actually did something different but it worked. I don't know how but it is working.
I used this in XO in Cloud Config

It worked
Don't know if does it matter or not ( probably does) that I also entered this plugin into both files :
cloudbaseinit.plugins.common.sethostname.SetHostNamePlugin@jkatz said in Cloudbase-init on Windows:
You don't.
That is lame.
Wonder if domain join is possible with that...
-
I ran into the same issue when trying to configure a network adapter with cloudbase-init. The documentation says that the MAC address value is optional but in reality it is required.
In my case I want Xen Orchestra to choose a unique MAC during deployment, and I since I am deploying from a template, the NIC name is a known value. The fix that ended up working for me was to modify the networkconfig.py file in cloudbase-init so that the NIC name is required and the MAC address is optional.
I ended up making some additional changes to allow for the network-config v2 format along with the existing v1 support and some additional logic to aid in setting the dns search domains (I can't recall if this was originally supported or not but I had issues getting it to work with the original networkconfig.py file)
This file needs to replace the existing one that is installed in the C:\Program Files\Cloudbase Solutions\Cloudbase-Init\Python\Lib\site-packages\cloudbaseinit\plugins\common\ directory. To replace it you should make sure that the cloudbase-init service is stopped, then replace the file.
Once this file is replaced, delete the pycache folder in the same parent folder as networkconfig.py - this will ensure that python recompiles this file on service start. Start the cloudbase-init service and confirm that you see a new pycache get created.
I'm not a python programmer by trade so others may be able to point out areas for improvement but this ended up working for me and I wanted to share in case it could help others needing to deploy new servers without manually specifying a new MAC address. Below is an example network-config v2 format that works with the updated file.
version: 2
ethernets:
Ethernet 2:
dhcp4: false
addresses:
- 10.20.30.10/24
nameservers:
addresses:
- 10.20.5.12
- 10.20.5.13
- 10.20.5.14
search:
- intranet.domain.org
- domain.org
- public-domain.org
routes:
- to: default
via: 10.20.30.1Updated networkconfig.py file:
networkconfig.py.txt -
@tmk said in Cloudbase-init on Windows:
I ran into the same issue when trying to configure a network adapter with cloudbase-init. The documentation says that the MAC address value is optional but in reality it is required.
In my case I want Xen Orchestra to choose a unique MAC during deployment, and I since I am deploying from a template, the NIC name is a known value. The fix that ended up working for me was to modify the networkconfig.py file in cloudbase-init so that the NIC name is required and the MAC address is optional.
I ended up making some additional changes to allow for the network-config v2 format along with the existing v1 support and some additional logic to aid in setting the dns search domains (I can't recall if this was originally supported or not but I had issues getting it to work with the original networkconfig.py file)
This file needs to replace the existing one that is installed in the C:\Program Files\Cloudbase Solutions\Cloudbase-Init\Python\Lib\site-packages\cloudbaseinit\plugins\common\ directory. To replace it you should make sure that the cloudbase-init service is stopped, then replace the file.
Once this file is replaced, delete the pycache folder in the same parent folder as networkconfig.py - this will ensure that python recompiles this file on service start. Start the cloudbase-init service and confirm that you see a new pycache get created.
I'm not a python programmer by trade so others may be able to point out areas for improvement but this ended up working for me and I wanted to share in case it could help others needing to deploy new servers without manually specifying a new MAC address. Below is an example network-config v2 format that works with the updated file.
version: 2
ethernets:
Ethernet 2:
dhcp4: false
addresses:
- 10.20.30.10/24
nameservers:
addresses:
- 10.20.5.12
- 10.20.5.13
- 10.20.5.14
search:
- intranet.domain.org
- domain.org
- public-domain.org
routes:
- to: default
via: 10.20.30.1Updated networkconfig.py file:
networkconfig.py.txtThank you for posting! I followed your directions verbatim and I'm still having trouble getting the network config to take. Does it work with Windows Server 2025?
-
@tmk hi !
Many thanks, your modified python file did the trick, my static IP address is now working as intented.I can confirm this is working on Windows 2025 Server as well.
-
Still having trouble getting it to take the network config, even with the new networkconfig.py file copied in and recompiled.
This is what I'm using:
network:
version: 2
ethernets:
Ethernet 2:
dhcp4: false
addresses:
- x.x.x.x/16
nameservers:
addresses:
- x.x.x.x
- x.x.x.x
search:
- my.domain.net
routes:
- to: default
via: x.x.x.x
Any ideas?
-
@MK.ultra I'd say make sure that your network-config is formatted properly with the correct YAML formatting (posting the content on this forum strips some of the formatting). Also, verify that you're using the correct network adapter name, "Ethernet 2" was just the name of the NIC I was using in my template.
If that's not an issue the next step would be to check the cloudbase-init logs to see what's reported there. You may need to enable debug logging in the cloudbase config file to get all of the relevant info depending on the issue.
-
I did stick to version: 1 in my working configuration
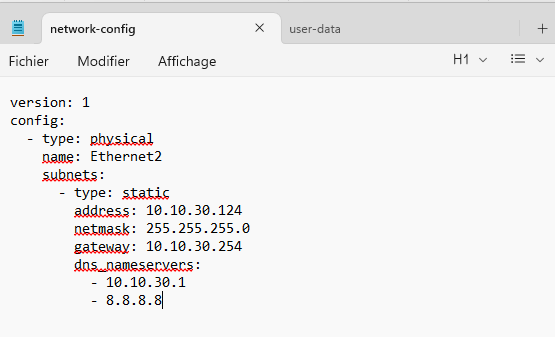
Had to rename my "Ethernet 2" nic name to Ethernet2 without the space
You have to put the exact template nic name for this to work.
-
Is "network:" required at the top of the network config? And is "cloud-config" required at the top for the user config?
-
@MK.ultra don't think so
it's working without for me.
-
Alright I finally got it to work.
I think the trick was to put "Ethernet 2" in quotations. I also perfected the YAML spacing and bracketed the two nameserver addresses.
Thanks for the help gentlemen. Final working network config:
#network:
  version: 2
  ethernets:
    "Ethernet 2":
      dhcp4: false
      addresses:
        - 192.168.1.30/24
      gateway4: 192.168.1.1
      nameservers:
        addresses: [192.168.1.5, 8.8.8.8]