
How to use load balancing in XCP-ng
VM load balancing is the process of automatically moving your live VMs between multiple physical hosts in order to spread your memory and CPU workload across multiple machines. Let's see how it works in the XCP-ng world!
Prerequisites
Before going any further, you must have Xen Orchestra running in your existing XCP-ng infrastructure. If that's not the case yet, the easiest way is to deploy a fresh Xen Orchestra virtual Appliance (XOA) by following this simple guide. You need to have XOA's Premium subscription level to enjoy Load Balancing, but this can be achieved via a free trial (please ask, we'll be happy to provide a new free trial if you need!).

Load balancing overview
The main goal of load balancing is to distribute the VM load across your hosts and adapt to changes in workload, doing all of this live in realtime (without any production impact). To achieve this, our XO load balancing plugin will check the current state of the infrastructure to balance every minute. By design, Xen Orchestra is connected to all your hosts, allowing XOA to load balance VMs on your whole infrastructure if you like!
By the way, a load balancing policy is called a plan. Let's take a simple example of how a load balancing plan can help you to give more "breathing space" for your VMs!
A simple example
We can imagine 2 hosts (Host 1 and Host 2) running with 6 VMs. Let's admit that to start, all those VMs are only using 5% of all their CPUs:

But suddenly, one of your VMs on Host 2 starts using a lot more CPU, the yellow one in our example. The other VMs on this host might be negatively impacted by this noisy neighbor:

XO Load balancer will detect this increased load. By computing that the idle VMs (in pink) will only raise the Host 1 load slightly, it will decide to migrate those VMs into Host 1:

In that case, your noisy/busy yellow VM will not impact the rest of your production. Obviously, this is just an example. This plan (policy) is called Performance, since it tries to always achieve the maximum level of performance for your VMs, spreading the VMs on all available hardware.
But there's also a Density mode (trying to migrate VMs to the fewest hosts possible). And finally, you have a Simple mode, which does not do any load balancing based on performance, but instead acting on customer placement rules, like anti-affinity.
The case of anti-affinity
This plan (policy) will prevent VMs with the same tag from running on the same physical host. Why? Because maybe you are running replication/redundancy at the VM level: for example, a replicated database between 2 VMs. You don't want to have those 2 VMs on the same physical host in case of a hardware failure.
In order to be sure they won't run on the same physical machine, you'll create your own tags and add them to the anti-affinity list.
Configure your load balancing plan
To configure your plan, just navigate to the Xen Orchestra main menu, then "Settings" and finally "Plugin". Open the "load-balance" plugin and enter the "Configuration" section.
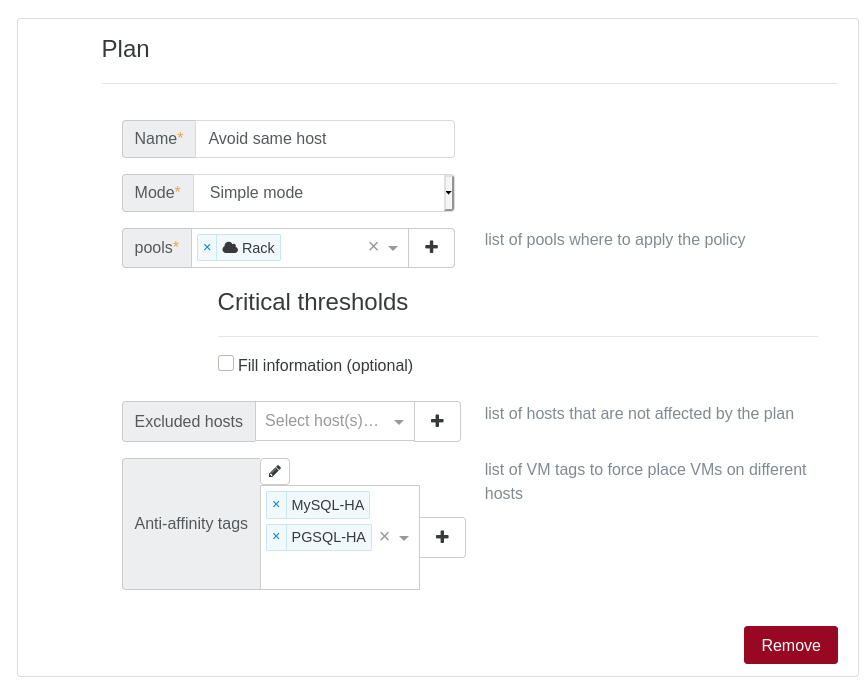
You need to tick the checkbox "Fill information" to display the plan menu. A plan has a name, a mode (Performance, Density or Simple), a list of pools to apply the policy (one is fine obviously) and some optional settings, like excluded hosts (won't be affected by the plan) and the anti-affinity options if you want to use them.
Here is an example of an anti-affinity plan on the pool "Rack" for VMs with the tag MySQL-HA and PGSQL-HA:
That's it!
What's next?
We're happy to continue improving the feature, and we might rename it in the future: after all, it's not just load balancing anymore, but also VM placement, coming closer to a "resource scheduler". That's why your feedback is important: if you want some improvements, please tell us, your opinion is always welcome. Please tell us on our forum!