OVA import failing
-
Bonus question: are you testing on XOA or XO installed from the sources? If the latter, I'd like to rule out a environment issue, so please test with XOA if you can

-
Apparently it is XO from sources but we will test with XOA also.
-
Okay thanks.
-
Ok, .ova files are actually tar files.
would you mind listing the content of the tar file and dumping the content of the ovf file that is enclosed in the tar file, please?
This would spill your disk and network, and machine names here, are they sensitive too?
Nicolas.
-
We have now tried two things:
We have created a smaller, 4.5GB .ova which does not show the issue on our XO-from-source installation.
We also installed a copy of xo-server 5.57.3 XOA - An import of the original OVA seems to work correctly in this. So I am currently using the temporary XOA installation to work around my issue and get the VM imported.
I get "Unexpected EOF" error when attempting to untar it:
sudo tar -xvf cacti2_200605_111227.ova
cacti2_200605_111227.ovf
cacti2_200605_111227-disk1.vmdk
tar: Unexpected EOF in archive
tar: Unexpected EOF in archive
tar: Error is not recoverable: exiting now
Forget the above.. it looks like the copy I made to untar was incomplete.All the same the .ovf file is extracted and looks like this:
<?xml version="1.0" encoding="UTF-8"?> <!--Generated by VMware ESX Server, User: root, UTC time: 2020-06-05T14:08:46.702978Z--> <Envelope vmw:buildId="build-2068190" xmlns="http://schemas.dmtf.org/ovf/envelope/1" xmlns:cim="http://schemas.dmtf.org/wbem/wscim/1/common" xmlns:ovf="http://schemas.dmtf.org/ovf/envelope/1" xmlns:rasd="http://schemas.dmtf.org/wbem/wscim/1/cim-schema/2/CIM_ResourceAllocationSettingData" xmlns:vmw="http://www.vmware.com/schema/ovf" xmlns:vssd="http://schemas.dmtf.org/wbem/wscim/1/cim-schema/2/CIM_VirtualSystemSettingData" xmlns:xsi="http://www.w3.org/2001/XMLSchema-instance"> <References> <File ovf:href="cacti2_200605_111227-disk1.vmdk" ovf:id="file1" ovf:size="21387534336" /> <File ovf:href="cacti2_200605_111227-disk2.vmdk" ovf:id="file2" ovf:size="2012185088" /> </References> <DiskSection> <Info>Virtual disk information</Info> <Disk ovf:capacity="80" ovf:capacityAllocationUnits="byte * 2^30" ovf:diskId="vmdisk1" ovf:fileRef="file1" ovf:format="http://www.vmware.com/interfaces/specifications/vmdk.html#streamOptimized" ovf:populatedSize="65193312256" /> <Disk ovf:capacity="80" ovf:capacityAllocationUnits="byte * 2^30" ovf:diskId="vmdisk2" ovf:fileRef="file2" ovf:format="http://www.vmware.com/interfaces/specifications/vmdk.html#streamOptimized" ovf:populatedSize="24077271040" /> </DiskSection> <NetworkSection> <Info>The list of logical networks</Info> <Network ovf:name="Management"> <Description>The Management network</Description> </Network> </NetworkSection> <VirtualSystem ovf:id="cacti2_200605_111227"> <Info>A virtual machine</Info> <Name>cacti2_200605_111227</Name> <OperatingSystemSection ovf:id="80" ovf:version="6" vmw:osType="rhel6_64Guest"> <Info>The kind of installed guest operating system</Info> </OperatingSystemSection> <VirtualHardwareSection> <Info>Virtual hardware requirements</Info> <System> <vssd:ElementName>Virtual Hardware Family</vssd:ElementName> <vssd:InstanceID>0</vssd:InstanceID> <vssd:VirtualSystemIdentifier>cacti2_200605_111227</vssd:VirtualSystemIdentifier> <vssd:VirtualSystemType>vmx-08</vssd:VirtualSystemType> </System> <Item> <rasd:AllocationUnits>hertz * 10^6</rasd:AllocationUnits> <rasd:Description>Number of Virtual CPUs</rasd:Description> <rasd:ElementName>8 virtual CPU(s)</rasd:ElementName> <rasd:InstanceID>1</rasd:InstanceID> <rasd:ResourceType>3</rasd:ResourceType> <rasd:VirtualQuantity>8</rasd:VirtualQuantity> <vmw:CoresPerSocket ovf:required="false">4</vmw:CoresPerSocket> </Item> <Item> <rasd:AllocationUnits>byte * 2^20</rasd:AllocationUnits> <rasd:Description>Memory Size</rasd:Description> <rasd:ElementName>8192MB of memory</rasd:ElementName> <rasd:InstanceID>2</rasd:InstanceID> <rasd:ResourceType>4</rasd:ResourceType> <rasd:VirtualQuantity>8192</rasd:VirtualQuantity> </Item> <Item> <rasd:Address>0</rasd:Address> <rasd:Description>SCSI Controller</rasd:Description> <rasd:ElementName>SCSI Controller 0</rasd:ElementName> <rasd:InstanceID>3</rasd:InstanceID> <rasd:ResourceSubType>VirtualSCSI</rasd:ResourceSubType> <rasd:ResourceType>6</rasd:ResourceType> <vmw:Config ovf:required="false" vmw:key="slotInfo.pciSlotNumber" vmw:value="160" /> </Item> <Item> <rasd:Address>1</rasd:Address> <rasd:Description>IDE Controller</rasd:Description> <rasd:ElementName>VirtualIDEController 1</rasd:ElementName> <rasd:InstanceID>4</rasd:InstanceID> <rasd:ResourceType>5</rasd:ResourceType> </Item> <Item> <rasd:Address>0</rasd:Address> <rasd:Description>IDE Controller</rasd:Description> <rasd:ElementName>VirtualIDEController 0</rasd:ElementName> <rasd:InstanceID>5</rasd:InstanceID> <rasd:ResourceType>5</rasd:ResourceType> </Item> <Item ovf:required="false"> <rasd:AutomaticAllocation>false</rasd:AutomaticAllocation> <rasd:ElementName>VirtualVideoCard</rasd:ElementName> <rasd:InstanceID>6</rasd:InstanceID> <rasd:ResourceType>24</rasd:ResourceType> <vmw:Config ovf:required="false" vmw:key="enable3DSupport" vmw:value="false" /> <vmw:Config ovf:required="false" vmw:key="enableMPTSupport" vmw:value="false" /> <vmw:Config ovf:required="false" vmw:key="use3dRenderer" vmw:value="automatic" /> <vmw:Config ovf:required="false" vmw:key="useAutoDetect" vmw:value="false" /> <vmw:Config ovf:required="false" vmw:key="videoRamSizeInKB" vmw:value="8192" /> </Item> <Item ovf:required="false"> <rasd:AutomaticAllocation>false</rasd:AutomaticAllocation> <rasd:ElementName>VirtualVMCIDevice</rasd:ElementName> <rasd:InstanceID>7</rasd:InstanceID> <rasd:ResourceSubType>vmware.vmci</rasd:ResourceSubType> <rasd:ResourceType>1</rasd:ResourceType> <vmw:Config ovf:required="false" vmw:key="allowUnrestrictedCommunication" vmw:value="false" /> <vmw:Config ovf:required="false" vmw:key="slotInfo.pciSlotNumber" vmw:value="32" /> </Item> <Item ovf:required="false"> <rasd:AddressOnParent>0</rasd:AddressOnParent> <rasd:AutomaticAllocation>false</rasd:AutomaticAllocation> <rasd:ElementName>CD-ROM 1</rasd:ElementName> <rasd:InstanceID>8</rasd:InstanceID> <rasd:Parent>4</rasd:Parent> <rasd:ResourceSubType>vmware.cdrom.remoteatapi</rasd:ResourceSubType> <rasd:ResourceType>15</rasd:ResourceType> </Item> <Item> <rasd:AddressOnParent>0</rasd:AddressOnParent> <rasd:ElementName>Hard Disk 1</rasd:ElementName> <rasd:HostResource>ovf:/disk/vmdisk1</rasd:HostResource> <rasd:InstanceID>9</rasd:InstanceID> <rasd:Parent>3</rasd:Parent> <rasd:ResourceType>17</rasd:ResourceType> <vmw:Config ovf:required="false" vmw:key="backing.writeThrough" vmw:value="false" /> </Item> <Item> <rasd:AddressOnParent>1</rasd:AddressOnParent> <rasd:ElementName>Hard Disk 2</rasd:ElementName> <rasd:HostResource>ovf:/disk/vmdisk2</rasd:HostResource> <rasd:InstanceID>10</rasd:InstanceID> <rasd:Parent>3</rasd:Parent> <rasd:ResourceType>17</rasd:ResourceType> <vmw:Config ovf:required="false" vmw:key="backing.writeThrough" vmw:value="false" /> </Item> <Item ovf:required="false"> <rasd:AddressOnParent>0</rasd:AddressOnParent> <rasd:AutomaticAllocation>false</rasd:AutomaticAllocation> <rasd:Description>Floppy Drive</rasd:Description> <rasd:ElementName>Floppy 1</rasd:ElementName> <rasd:InstanceID>11</rasd:InstanceID> <rasd:ResourceSubType>vmware.floppy.remotedevice</rasd:ResourceSubType> <rasd:ResourceType>14</rasd:ResourceType> </Item> <Item> <rasd:AddressOnParent>7</rasd:AddressOnParent> <rasd:AutomaticAllocation>false</rasd:AutomaticAllocation> <rasd:Connection>Management</rasd:Connection> <rasd:Description>VmxNet3 ethernet adapter on "Management"</rasd:Description> <rasd:ElementName>Ethernet 1</rasd:ElementName> <rasd:InstanceID>12</rasd:InstanceID> <rasd:ResourceSubType>VmxNet3</rasd:ResourceSubType> <rasd:ResourceType>10</rasd:ResourceType> <vmw:Config ovf:required="false" vmw:key="slotInfo.pciSlotNumber" vmw:value="192" /> <vmw:Config ovf:required="false" vmw:key="wakeOnLanEnabled" vmw:value="true" /> </Item> <vmw:Config ovf:required="false" vmw:key="cpuHotAddEnabled" vmw:value="false" /> <vmw:Config ovf:required="false" vmw:key="cpuHotRemoveEnabled" vmw:value="false" /> <vmw:Config ovf:required="false" vmw:key="firmware" vmw:value="bios" /> <vmw:Config ovf:required="false" vmw:key="virtualICH7MPresent" vmw:value="false" /> <vmw:Config ovf:required="false" vmw:key="virtualSMCPresent" vmw:value="false" /> <vmw:Config ovf:required="false" vmw:key="memoryHotAddEnabled" vmw:value="false" /> <vmw:Config ovf:required="false" vmw:key="nestedHVEnabled" vmw:value="false" /> <vmw:Config ovf:required="false" vmw:key="powerOpInfo.powerOffType" vmw:value="soft" /> <vmw:Config ovf:required="false" vmw:key="powerOpInfo.resetType" vmw:value="soft" /> <vmw:Config ovf:required="false" vmw:key="powerOpInfo.standbyAction" vmw:value="powerOnSuspend" /> <vmw:Config ovf:required="false" vmw:key="powerOpInfo.suspendType" vmw:value="hard" /> <vmw:Config ovf:required="false" vmw:key="tools.afterPowerOn" vmw:value="true" /> <vmw:Config ovf:required="false" vmw:key="tools.afterResume" vmw:value="true" /> <vmw:Config ovf:required="false" vmw:key="tools.beforeGuestShutdown" vmw:value="true" /> <vmw:Config ovf:required="false" vmw:key="tools.beforeGuestStandby" vmw:value="true" /> <vmw:Config ovf:required="false" vmw:key="tools.syncTimeWithHost" vmw:value="false" /> <vmw:Config ovf:required="false" vmw:key="tools.toolsUpgradePolicy" vmw:value="manual" /> </VirtualHardwareSection> <AnnotationSection ovf:required="false"> <Info>A human-readable annotation</Info> <Annotation>Fro xen</Annotation> </AnnotationSection> </VirtualSystem> </Envelope> -
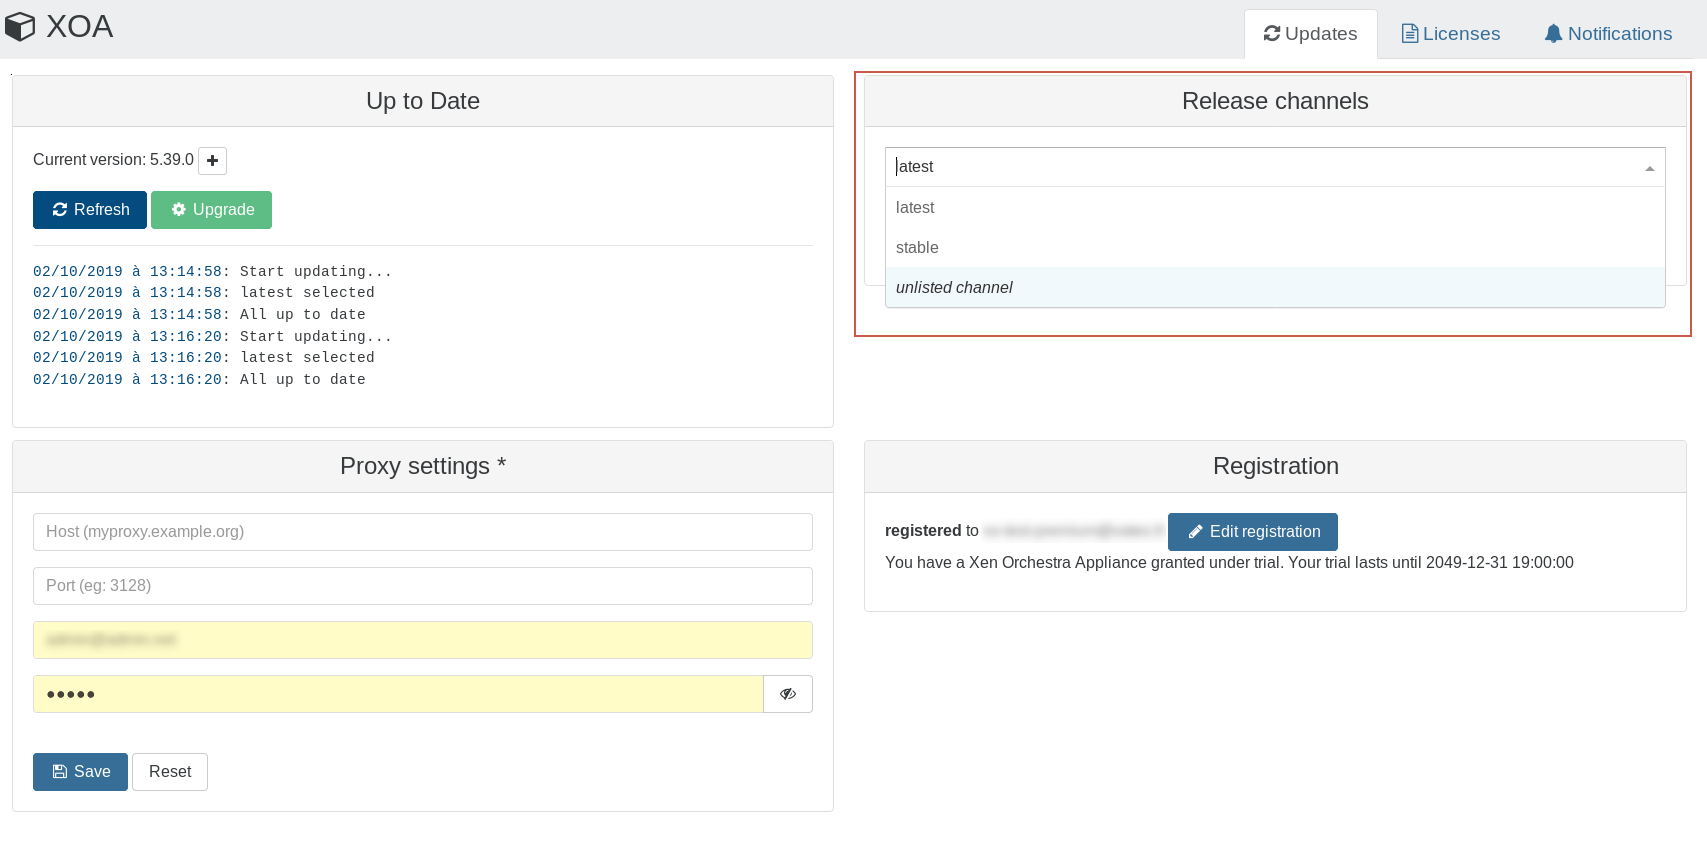
Just to be sure to get it: the original OVA file import is working with XOA? Are you on
stableorlatestrelease channel?Thx for the XML
-
Looks like it was installed using git from https://github.com/vatesfr/xen-orchestra
Excuse the possibly stupid sounding question but how do I tell if that's stable or latest? -
To answer your other question. Yes, the original OVA that failed to import with XO managed to import correctly with XOA. It has now finished its import process and appears to have completed the full import process correctly.
-
Release channels are only available on XOA (in XOA left menu entry, there's a "card" Release Channel): see https://xen-orchestra.com/docs/updater.html#release-channel

-
I confirm the same exact issue here using XO 5.60.0 from source with an .ova file of 10GB. If I import the file using XOA 5.59.0 stable it works without issues.
-
@tofaz and in XOA? I'd like to find where is the issue.
-
@olivierlambert in XOA 5.59.0 stable the import works without issues
-
And in latest, does it work?
-
XOA channel latest (5.60.0) reported the same issue as XO 5.60.0. So it looks like its a XOA issue appeared in latest version.
-
-
@olivierlambert Same as the one mentioned by the OP: Error: buffer grain directory address is too short, expecting 8 minimum, got 0
Thank you!
-
Hi Tofaz,
would you be able to transfer me the failing file please?
Thanks,
Nicolas.
-
@nraynaud Since my original VM had some confidential data I have created a new VM test in order to reproduce the issue. Well with this VM the problem does not occur even with XO 5.60. The only differences that I can think at the moment are Windows (before Windows Server 2019 and now Windows 10 pro) and the VMtools (before with tools and now without tools).
I will run more test and let you know.
Thank you!
-
@tofaz Thank you, it's really hard to find the bug without a reliable reproduction. Even for simple bugs.
-
@nraynaud I sent you the link of the VM via PM. It looks like the web interface is not complaining but then the VM is not able to find a bootable hard disk upon start.