Install XO from sources.
-
v0.4.1 and v0.4.2 are out.
v0.4.1 — mostly credential encryption (
ENCRYPT_REDIS_CREDENTIALS)- The preflight check now catches a Xen guest that's missing
xenstore-read/xenstore-write. Before, that guest passed thesystemd-detect-virtcheck and then failed later at xo-server startup, because there was nowhere to store the XenStore half of the key. It now names the missing tools and the package that provides them. --backupnow warns that it contains neither half of the encryption key, and points at the passphrase-protected XO config export as the actual recovery artifact.--uninstallwarns before deleting this host's on-disk key half — doing so while leaving Redis in place turns the stored records into unreadable ciphertext.- The docs (README, sample config, generated
config.tomlcomments) now explain why the XAPI credential in Redis is stored reversibly instead of hashed: it's replayed on every connect and auto-reconnect, so it can't be a hash. They also spell out the recovery caveats — the key is split between XenStore and/var/lib/xo-server/data, and losing either half while encryption is on makes the records permanently undecryptable. - Also flagged in the sample config: pointing
REDIS_URIat an off-host Redis sends the pool credentials over the network in cleartext.
v0.4.2 — docs and packaging only, no behaviour change:
- The README had grown past 700 lines, with the
--deploywalkthrough alone taking up a third of it. The large reference sections moved out todocs/deployment.md,docs/configuration.md,docs/authentication.mdanddocs/troubleshooting.md; the README is back to ~330 lines with a table pointing at them. Nothing was removed. - Expanded the badge row — release tag, last commit, open issues, unit-test count, number of distros the CI container matrix covers, and ShellCheck status.
Where the project's got to
I started this in February as a script to save myself doing the from-source install by hand every time I rebuilt my homelab. Seven months and twelve tagged releases later it's grown into something a fair bit bigger:
--installdoes the from-source build on whatever distro you run it on — the Debian/Ubuntu, RHEL/Alma/Rocky/CentOS and Fedora families, eight distributions in all, each one smoke-tested in CI alongside 118 unit tests.--deploy(added in v0.3.0) starts a step earlier: point it at a XCP-ng / XenServer pool and it builds the VM, pulls a Debian cloud image straight onto the pool, seeds it with cloud-init and runs the install inside it. It's there for people who have a pool but no Linux VM to put XO on.--proxydeploys an XO Proxy VM the same way — that one came straight out of requests in this thread.- Around that: a config file so nothing needs editing in the script itself,
--update/--rebuildwith a local build cache,--backup/--restore/--uninstall, non-root operation with encrypted Redis credentials, firewall handling, and a lot of--deploysecurity work in v0.4.0 — image checksums, pool host-key pinning, the deploy SSH key destroyed at the end of the run, a required admin password, passwordless sudo revoked once the install finishes.
Since the v0.3.0 / v0.4.0 post a couple of weeks ago the repo has had 263 clones from 49 unique cloners.
Thanks
To everyone in this thread who's installed it, tested it and come back with feedback — genuinely, thank you. The proxy support, the credential-encryption questions that turned into proper docs, the config-file suggestions, the distro edge cases on systems I don't run myself: several of the releases above have something in them that started as a post here. Keep it coming.
Repo: https://github.com/acebmxer/install_xen_orchestra
Changelog: https://github.com/acebmxer/install_xen_orchestra/blob/main/CHANGELOG.md - The preflight check now catches a Xen guest that's missing
-
install_xen_orchestra v0.5.0 — build your own cloud-init VM templates
As I am sure most of you know that XOA Hub is not accessible from Xen Orchestra from sources.
So v0.5.0 of my install script adds a VM Template Library — a new
--build-templatesflag (and menu entry) that builds the equivalent on your own pool, from each distribution's own published cloud image../install-xen-orchestra.sh --build-templatesIt runs from your workstation over SSH against the pool master, like
--deploydoes. Nothing is installed locally and your XO install isn't touched.What you get
A sealed template that shows up next other vm templates you have, with:
- cloud-init — supply an SSH key or a full cloud-config at VM creation.
- XCP-ng guest tools, installed from
guest-tools.isoon the pool. Without these XO never reports the VM's IP. On Debian 13 there's no
xe-guest-utilitiespackage, and a failed package install doesn't stop cloud-init, so an apt-first approach silently gives you a template that looks fine and is useless. The ISO is what the XCP-ng docs prescribe anyway. - A scrubbed identity — machine-id, SSH host keys, cloud-init state and logs are all wiped before sealing, so clones don't collide on DHCP leases or share an SSH fingerprint.
- growroot, so the disk size you ask for at creation is actually filled.
- One template for both BIOS and UEFI — the Debian generic images carry an ESP and a BIOS boot partition, so you just flip "Boot firmware" in XO's advanced settings. The build itself isn't prompted for storage or network —
it uses your pool's default SR (or the emptiest one, if you haven't set a default) and the management network. Both are just build-time choices; you pick whatever you want when you actually create a VM from the template.
Images are pulled from the distribution's own mirror (nothing redistributed), downloaded onto the pool master so the ~3 GB never crosses your workstation's link, and verified against the origin's published
SHA512SUMSat build time
—so new upstream releases get picked up without me editing anything.Allow roughly five to ten minutes per template; it has to boot the VM once to
install the guest agent and run the scrub.Distros
Debian 13 (Trixie) is the only one for now. That's a starting point, not the limit — the catalogue is a table with one row per distro, and adding another is a row in that table, not a change to the build.
So: comment here if there's a specific distro you'd want to see sooner rather than later and I'll prioritise accordingly.
Repo: https://github.com/acebmxer/install_xen_orchestra
Docs for this feature: https://github.com/acebmxer/install_xen_orchestra/blob/main/docs/templates.md -
install_xen_orchestra v0.7.2 — twelve templates, and the builder can now use XO's own API
Since the v0.5.0 post the template library has gone from one distro to twelve, and it picked up a second way of talking to the pool. Everything from v0.5.0 through v0.7.2, in one place.
Templates: twelve buildable, three still to come
v0.5.0 shipped with Debian 13 and I asked here which distros to do next. That list is now:
- Debian 12, 13
- Ubuntu 22.04, 24.04, 26.04 LTS
- AlmaLinux 8, 9, 10
- CentOS Stream 9, 10
- Fedora 43, 44
Rocky Linux 8/9/10 are the only rows still marked Coming Soon... in the menu.
Every one of these is a row in the catalogue table rather than new build code, which is what I said in the v0.5.0 post I was aiming for. Each image did get read individually rather than assumed to match its neighbour — default user, disk size, kernel type, partition table — because those differ inside a family. Ubuntu 22.04 expands to 2.2 GiB and 24.04 to 3.5 GiB, so copying one figure across the family would have inflated every VM cloned from the smaller one.
Two things that had to be solved along the way and now apply to every image:
- qcow2 images import. Debian publishes raw; almost everyone else publishes qcow2, so the builder converts before importing.
- The shipped password actually works. The RHEL-family and Fedora images declare
lock_passwd: Truefor their default user, and cloud-init re-locks that account on every boot — so the password the build set was already locked by the time a clone came up. The build now drops a file in/etc/cloud/cloud.cfg.dturning that off. Delete it once you've put your own SSH keys on. Key auth was never affected.
Arrow keys in the template menu now skip the Coming Soon rows instead of stepping through them.
The builder can now go through XO's API instead of SSH to dom0
Template building has always driven
xeover SSH to the pool master, which means having the pool master's root password to hand. Everything it does that way, XO exposes over its own API — create the VM, import the disk, build the cloud-init drive — so v0.7.0 added that as a second path.Which one makes sense depends on where you run it from. If you installed with
--deploy, this repo is sitting inside the XO VM and that's where you run--updatefrom, so XO is on localhost and you already have an API token inxo-config.cfgfor the pre-update task check. Same token, no root password. Run it from your workstation against a pool with no XO on it yet and none of that is true, so SSH stays.TEMPLATE_BUILD_METHODpicks:auto # default — API if it's reachable and authenticated, else SSH, and it says which and why api # API only, no fallback ssh # exactly what it did beforeThe choice is made by a preflight check before anything gets created on the pool, so a fallback costs you nothing but a different password prompt. On the API path the image streams from its mirror straight into XO without being staged to a file, and XO builds the cloud-init drive itself — so no ISO writer needed on the machine you're running from.
Two new config keys:
XO_API_TOKENandXO_URL.XO_API_TOKENreplacesXO_TASK_CHECK_TOKENin name only — the old key is still read, so an existing config keeps working untouched.XO_URLcan be left unset on the XO VM itself, and falls back toPUBLIC_URLif you've set that.--deployfixes- The appliance now gets the XCP-ng guest tools. A deployed VM had no guest agent at all, so the XO it was itself hosting couldn't report its IP, memory or disk usage, and couldn't shut it down cleanly. It ran fine while looking half-blank in the very interface it served.
- It now boots UEFI, not BIOS. Nothing was ever setting the firmware parameter, so a VM from
--deployand a VM cloned from a--build-templatestemplate came out of the same script with different firmware. It's probed from the disk now, same as the builder does. - The temporary deployment SSH key is actually removed. It wasn't being deleted, leaving a working key on the VM.
Progress bars
curl --progress-barredraws the whole line every update and leaves the cursor sitting in it, which over SSH is a cursor visibly scribbling back and forth instead of a bar filling up. All four transfers now draw a bar that doesn't repaint, including the one that stages the image on the pool master — which is the longest step of a deploy and was the one people would actually be watching.Also
- Templates get sensible platform settings instead of inheriting them from the scaffolding:
vga=stdwith 16 MiB video memory (the stock 4 MiB cirrus is what leaves the console at 640x480), viridian off (it's Hyper-V enlightenment, meant for Windows), and cores-per-socket matching the vCPU count. - Checksum verification works for every origin now. AlmaLinux, CentOS Stream and Fedora would each have 404'd on the wrong filename and imported unverified with a warning.
- Debian 11 and Ubuntu 22.04 are deprecated with dates on them, and the menu says so rather than the row silently vanishing one day.
- The README's menu screenshots no longer need a horizontal scrollbar on GitHub.
353 unit tests, and CI smoke-tests the install on 10 distros.
Repo: https://github.com/acebmxer/install_xen_orchestra
Changelog: https://github.com/acebmxer/install_xen_orchestra/blob/main/CHANGELOG.md
Templates doc: https://github.com/acebmxer/install_xen_orchestra/blob/main/docs/templates.md -
@acebmxer Is there a way to make the update feature completely unattended so it can be configured to run as a cron job?
Regards
-
@acebmxer Is there a way to make the update feature completely unattended so it can be configured to run as a cron job?
Regards
Sure... Make sure you configure xo-config.cfg correctly.
./install-xen-orchestra.sh --update. It would only prompt for sudo passwor d.Available Functions
Function CLI Flag Description Deploy --deployCreate a Debian VM on a XenServer/XCP-ng pool and install XO into it Build Templates --build-templatesBuild cloud-init VM templates on a XenServer/XCP-ng pool Install --installFresh install of Xen Orchestra Update --updateUpdate existing installation (with backup) Restore --restoreRestore from a previous backup (verified for completeness first; add --list-backupsto just list them)Rebuild --rebuildFresh clone + clean build, preserves settings Reconfigure --reconfigureApply config changes without rebuilding XO Proxy --proxyDeploy XO Proxy to a Xen pool master Adjust Memory --adjust-memoryRaise the heap memory allocated to the xo-serverprocessStatus --statusRead-only health report: version, service, TLS cert, disk/swap, backups/snapshots, git state Edit Config (menu only) Open xo-config.cfgin your preferred editorRename Config (menu only) Rename sample-xo-config.cfgtoxo-config.cfgRunning without flags launches an interactive menu. All flags also work directly:
./install-xen-orchestra.sh # interactive menu ./install-xen-orchestra.sh --update # run update directly ./install-xen-orchestra.sh --help # show all options -
@acebmxer Excellent! Thanks a lot!
-
-
install_xen_orchestra v0.9.0 — install optional server plugins with
--custom-pluginsSince the v0.7.2 post there's been a safety-net release (v0.8.0) and a new feature (v0.9.0). Everything from v0.8.0 through v0.9.0, in one place.
v0.8.0: VM snapshots before update/rebuild, and every RHEL template is now buildable
--updateand--rebuildnow take a normal XO API snapshot of the XO VM itself before touching anything, on top of the existing file backup — it shows up in XO's own UI under the VM's Snapshots tab like any other. Old ones get pruned automatically (keeps 3, or 14 days, whichever you set) so they don't pile up and trip XO's own Health-view warnings. This only works when XO itself is a Xen guest; bare metal just keeps the file backup as before.Also new: a
--statuscommand that gives a read-only summary — version, how far behind master, service state, TLS cert expiry, disk/swap, backup and snapshot counts — and a--list-backupsto see what's there without going through a restore. TLS certs now get a warning once they're under 30 days from expiring, wherever that check would previously only surface as a failed connection.Rocky Linux 8, 9 and 10 dropped their "Coming Soon..." tag and build now — same
tpl_prep_rhelscript the AlmaLinux and CentOS Stream rows already use, since it's the same family. Every row in the template catalogue builds something now.Rest of v0.8.0 was a security hardening pass — checksum-verifying the Node.js download, no more passwords on the command line for the XO Proxy helper, tightened file permissions on
config.tomland the swap file — worth a look at the CHANGELOG if you're running this on anything you care about.v0.9.0:
--custom-plugins— install optional xo-server plugins with one commandXO has a plugin system (
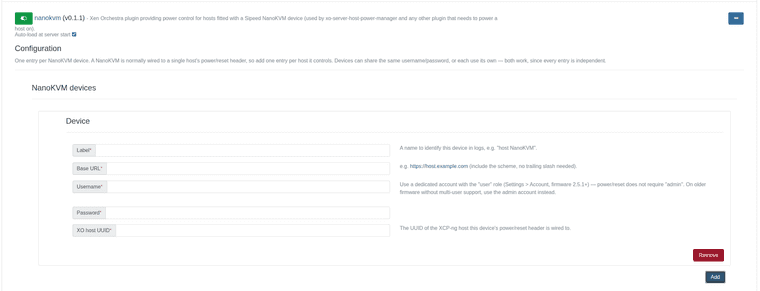
xo-server-auth-ldap,xo-server-load-balancer, that kind of thing) but nothing installs one for you — you're expected to drop it undernode_modulesby hand and restart the service.--custom-plugins(new menu entry too) does that part: pick a plugin, it gets copied to/usr/local/lib/node_modules/<name>— outside/opt/xen-orchestra, so--update's rebuild never touches it — andxo-serverrestarts to pick it up. Run it again and anything already installed shows pre-checked; uncheck to remove, check something new to install, leave one checked to refresh it if this repo's copy has changed since. Configuration itself still happens the normal way, in XO's own Settings > Plugins.Two plugins ship to start:
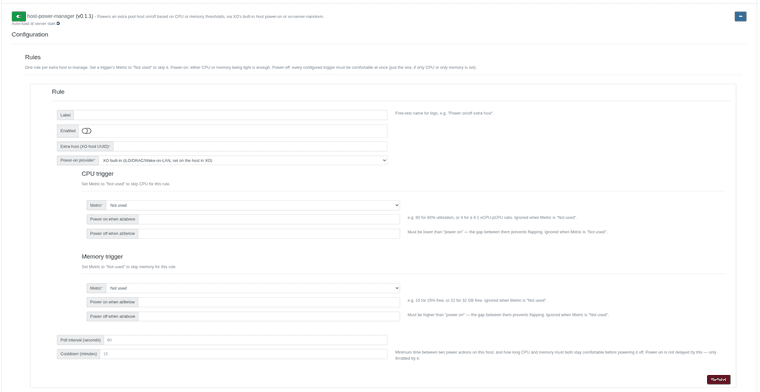
xo-server-nanokvm— power control for a host fitted with a Sipeed NanoKVM, over its REST API.xo-server-host-power-manager— powers an extra pool host on when CPU or memory gets tight, and powers it back off (evacuated first, same path as XO's own maintenance mode) once it isn't needed. Power-on can go through NanoKVM or XO's built-in iLO/DRAC/Wake-on-LAN.
Docs: docs/custom-plugins.md
The host-power-manager plugin got the most testing this round, and threw up a few real bugs against a live pool: saving its settings while it was already running silently killed every rule's timer until the next
xo-serverrestart, its CPU/memory numbers disagreed with XO's own dashboard because it was excluding the managed host from the pool total, and there was no way to build a CPU-only or memory-only rule since both thresholds were required. All three are fixed, and power-off is now HA-aware — it defers to XAPI's own failover check and just leaves the host running and retries later rather than forcing an evacuation that would break your HA plan.Repo: https://github.com/acebmxer/install_xen_orchestra
As always, let me know if you try either plugin out or hit anything.
-
Small update — I split the custom plugins out of this project into their own repo, for anyone who just wants the plugins without pulling in the whole install script:
https://github.com/acebmxer/xo-plugins
Same deal as always — use at your own risk, review the code before running it on anything that matters. The two plugins in there are also still shipped inside this install script's Custom Plugins menu, kept in sync automatically — this repo just exists for people who don't want the rest of the project.
xo-server-nanokvm
This one's probably the more useful of the two for a lot of people. If you've got a host with no iLO/DRAC/IPMI — most consumer/prosumer boards, a lot of homelab gear — and you've wired up a Sipeed NanoKVM to the power header, this plugin lets Xen Orchestra power that host back on through the NanoKVM's own API. Same interface the NanoKVM web UI itself uses to press the button, just done from XO.
On its own it doesn't decide when to turn a host on, it just gives XO a way to do it. Pairs with the other plugin below for that, or you could call it from your own automation if you wanted.
Worth knowing: it can only press the button, it has no way to know if the host is actually on or off, so it only handles power-on. Powering off goes through XO's normal shutdown, which is a clean OS shutdown and evacuates VMs first — no reason to route that through the NanoKVM.
Setup is a config entry per host: label, the NanoKVM's URL, a login, and which XO host it's wired to. Recommend making it a dedicated
user-role account on the NanoKVM rather than admin — that role already has power/reset access without giving the plugin anything to storage/network settings on the KVM itself.xo-server-host-power-manager
This is the one that actually decides when to act. Point it at an "extra" host in the pool and give it CPU and/or memory thresholds — when the rest of the pool is under pressure it powers that host on, and once things calm down for a while it powers it back off. Power-on can go through XO's built-in methods or through the NanoKVM plugin above, your choice per rule.
Powering off always goes through XO's own host shutdown — it evacuates the running VMs first, and if HA is on and doesn't have room to cover it, XAPI just refuses and the plugin backs off and tries again later rather than forcing anything.
It's deliberately quick to scale up and slow to scale down (needs both CPU and memory comfortable for a full cooldown period before it'll power a host off) so it's not flapping a host on and off over a short spike.
Both have a Test button in their config page that actually tells you something useful, unlike XO's own generic "test plugin" popup — check
journalctl -u xo-serverright after clicking it to see what it found.As always, happy to hear feedback or find out I've broken something.
-
@acebmxer Even with the credentials present in the configuration file, the process still prompts for sudo permissions, which will not be visible or actionable when running as a cron job.
-
Sorry for any confusion. Hope this clears it up.
The credentials in
xo-config.cfgare only for logging into Xen Orchestra (the pre-update task check and VM snapshot). There is no setting for a sudo password, and the script won't run as root, so sudo will still ask.To run it from cron, the account running the script needs passwordless sudo. Run this as that user:
echo "$USER ALL=(ALL) NOPASSWD:ALL" | sudo tee /etc/sudoers.d/xo-cron
sudo chmod 440 /etc/sudoers.d/xo-cron
sudo visudo -c
Then add
--non-interactiveso it doesn't stop to ask anything:0 3 * * * cd /path/to/install_xen_orchestra && ./install-xen-orchestra.sh --update --non-interactiveKeep in mind this gives that account full sudo with no password. Use at your own risk.
I've pushed this to the
devbranch, including a new Scheduled Updates (cron) section in the README. To try it before it reachesmain, switch your copy todev:cd /path/to/install_xen_orchestra git fetch origin git checkout devTo go back later, run
git checkout main.Scheduled Updates (cron)
--updatecan run unattended from cron. Two things are needed:-
Passwordless sudo for the account that runs the script. The script
refuses to run as root and callssudothroughout, and there is no config
setting for a sudo password. Run this as that account:echo "$USER ALL=(ALL) NOPASSWD:ALL" | sudo tee /etc/sudoers.d/xo-cron sudo chmod 440 /etc/sudoers.d/xo-cron sudo visudo -cThis gives the account full sudo with no password.
-
--non-interactive, so the update never stops to ask anything:0 3 * * * cd /path/to/install_xen_orchestra && ./install-xen-orchestra.sh --update --non-interactive >> "$HOME/xo-update.log" 2>&1
Set
XO_API_TOKEN(or the user/password pair) inxo-config.cfg.
Without it, a non-interactive run skips the
running task check instead of
prompting for credentials. -
-
@acebmxer Thank you for your help and prompt response. I truly appreciate it!
-
No problem. Let me know if you still encounter any issues.
-
Update - changes are live in the dev branch now.
So figured out the update / switching branches for the proxy by connecting the proxy to my xoa free account. That triggered the available update to next version. From there I found the command that needs to be ran on the proxy to switch back and forth...

Latest branch

stable branch

Backup job ran sucessful.
2026-10-09T17_48_25.447Z - backup NG.txt
After the proxy has been deployed...
The proxy has been registered with your Xen Orchestra instance.
You can manage it from the Xen Orchestra web interface.Next: register the proxy's updater and move it to the 'latest' channel.
- On the pool master (IP), set a password for the proxy's 'xoa' user
(choose your own) and reboot the proxy VM:
xe vm-param-set uuid=UUID xenstore-data:vm-data/system-account-xoa-password='<your password>'
xe vm-reboot uuid=UUID - SSH to the proxy as 'xoa' (IP) and run:
sudo xoa-updater register- This registers it with your vates account.
sudo xoa-updater configure-channel xo-proxy-appliance-latest- set tolatestorstable
sudo xoa-updater upgrade- This can be ran via the UI or this command. Both need to be done twice to do the upgrade and/or downgrade.
register needs a free xen-orchestra.com account; see the README.
And host connected via proxy.

- On the pool master (IP), set a password for the proxy's 'xoa' user

Hello! It looks like you're interested in this conversation, but you don't have an account yet.
Getting fed up of having to scroll through the same posts each visit? When you register for an account, you'll always come back to exactly where you were before, and choose to be notified of new replies (either via email, or push notification). You'll also be able to save bookmarks and upvote posts to show your appreciation to other community members.
With your input, this post could be even better 💗
Register Login