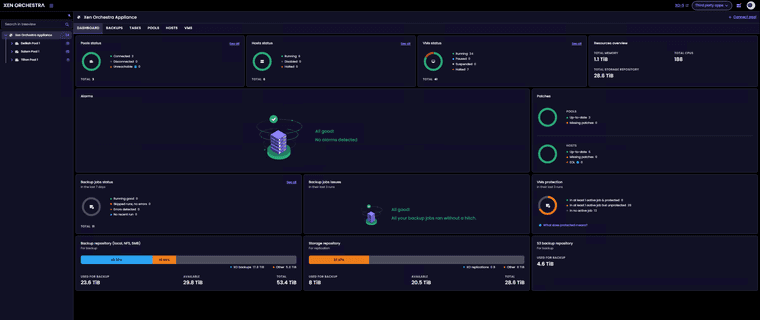
Finally just finished our migration from VMware to XCP-NG.
VMs - 34 mix windows server and ubuntu linux.
Pools - 3
Host - 6
Dell R660 - 2
Dell R640 - 4
Finally just finished our migration from VMware to XCP-NG.
VMs - 34 mix windows server and ubuntu linux.
Pools - 3
Host - 6
Dell R660 - 2
Dell R640 - 4
Updates applied...
Updated:
  forkexecd.x86_64 0:26.1.11-1.2.xcpng8.3                         kexec-tools.x86_64 1:2.0.15-21.1.xcpng8.3
  message-switch.x86_64 0:26.1.11-1.2.xcpng8.3                    qcow-stream-tool.x86_64 0:26.1.11-1.2.xcpng8.3
  rrdd-plugins.x86_64 0:26.1.11-1.2.xcpng8.3                      sm-cli.x86_64 0:26.1.11-1.2.xcpng8.3
  squeezed.x86_64 0:26.1.11-1.2.xcpng8.3                          varstored-guard.x86_64 0:26.1.11-1.2.xcpng8.3
  vhd-tool.x86_64 0:26.1.11-1.2.xcpng8.3                          wsproxy.x86_64 0:26.1.11-1.2.xcpng8.3
  xapi-core.x86_64 0:26.1.11-1.2.xcpng8.3                         xapi-nbd.x86_64 0:26.1.11-1.2.xcpng8.3
  xapi-rrd2csv.x86_64 0:26.1.11-1.2.xcpng8.3                      xapi-storage-script.x86_64 0:26.1.11-1.2.xcpng8.3
  xapi-tests.x86_64 0:26.1.11-1.2.xcpng8.3                        xapi-xe.x86_64 0:26.1.11-1.2.xcpng8.3
  xcp-networkd.x86_64 0:26.1.11-1.2.xcpng8.3                      xcp-rrdd.x86_64 0:26.1.11-1.2.xcpng8.3
  xenopsd.x86_64 0:26.1.11-1.2.xcpng8.3                           xenopsd-cli.x86_64 0:26.1.11-1.2.xcpng8.3
  xenopsd-xc.x86_64 0:26.1.11-1.2.xcpng8.3

Complete!
Will continue to test.
@rzr Installed latest update and no issues to report. I dont hvae any 2tb+ drives in my vms. converting from vhd to qcow2 and backups all working.
installed updates will report back.
Update - I had migrated vms back over to vhd prior to update release. I have migrated 2 vms back over to qcow2 and the initial backup ran successfull. Ran a second delta backup and that as well was successful with out issues. Backups happen very quickly now. But it appears the % and progress bar are working.
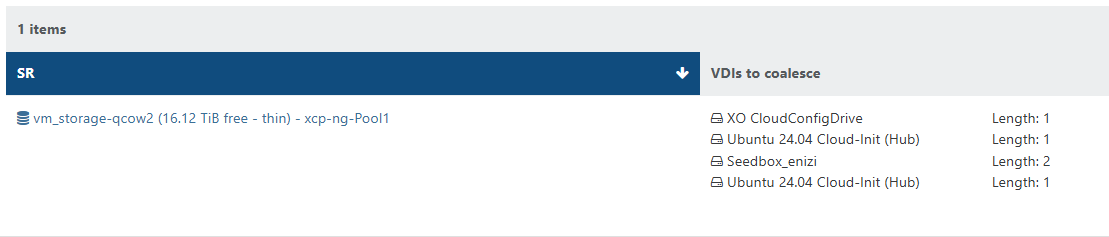
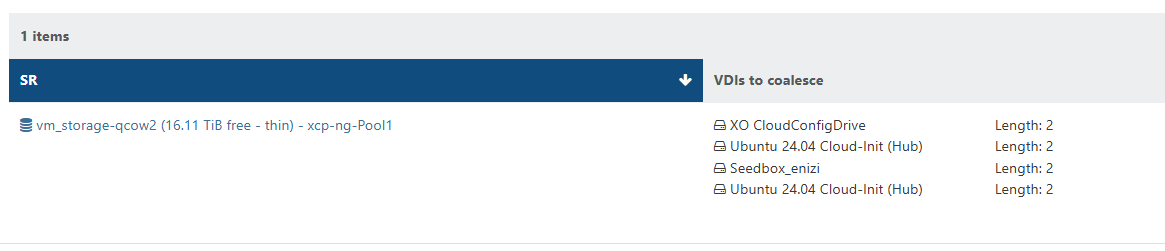
When CBT is enabled on the vm vdi. They show up as needing to be coalesced. VMs without CBT enabled the vdis are coalesced.
Will continue to monitor.
Once the coalesence hits 2 for the vm. The vm is skipped form future backups until cleared. (shutting down the vm will allow the coalescence to happen.
2026-04-23T19_52_34.694Z - backup NG.txt

@olivierlambert Created new topic.
Updated my to AMD Ryzen host in my home lab. No issues with update will monitor and report back any issues.
Ok that was in xo from sources and yes issue is fixed...
Confirmed is working in XOA in 6.4.1
While this project is more for myself it is open to others to use. Please use at your own risk. As always review the script before using in a production environment. Please leave any feedback or suggestions. https://github.com/acebmxer/install_xen_orchestra/
https://forums.pozzatech.com - You can read more about this project and other things over in my personal forums.
Automated installation and management of Xen Orchestra from source.
Update 5/15/26 - This update only applies to anyone using older version of script. See note. Also added option to Adjust Xen Orchestra Memory Allocation. It will look at the system memory and suggest setting for XO based off the official documentation.
⚠️ Upgrading from an earlier version of this script? Read this first.
This version bumps the config schema to v2 (adds PUBLIC_URL and ENCRYPT_REDIS_CREDENTIALS) and corrects two config.toml generation bugs. Your xo-config.cfg is migrated automatically and non-destructively, but the corrected /etc/xo-server/config.toml is only written by --reconfigure.

Run --reconfigure once before resuming normal updates:

./install-xen-orchestra.sh --reconfigure
This regenerates config.toml with the fixes (your old file is backed up first; data in /var/lib/xo-server is untouched). It is strongly recommended if you set both REDIRECT_TO_HTTPS=true and REVERSE_PROXY_TRUST — that combination previously produced a duplicate [http] section and silently dropped one of the settings.

Afterwards, run --update as normal for routine XO updates — --update does not need to be preceded by --reconfigure again.
| Function | CLI Flag | Description |
|---|---|---|
| Install | --install |
Fresh install of Xen Orchestra |
| Update | --update |
Update existing installation (with backup) |
| Restore | --restore |
Restore from a previous backup |
| Rebuild | --rebuild |
Fresh clone + clean build, preserves settings |
| Reconfigure | --reconfigure |
Apply config changes without rebuilding |
| XO Proxy | --proxy |
Deploy XO Proxy to a Xen pool master |
| Edit Config | (menu only) | Open xo-config.cfg in your preferred editor |
| Rename Config | (menu only) | Rename sample-xo-config.cfg to xo-config.cfg |
Running without flags launches an interactive menu. All flags also work directly:
./install-xen-orchestra.sh           # interactive menu
./install-xen-orchestra.sh --update  # run update directly
./install-xen-orchestra.sh --help    # show all options
Running the script with no arguments opens a two-column menu with keyboard navigation:
  ╔══════════════════════════════════════════════════════════════════════════════════╗
  ║              Install Xen Orchestra from Sources Setup and Update                 ║
  ╚══════════════════════════════════════════════════════════════════════════════════╝

                        Current Script Commit : 693f4 (Branch: main)
                        Master Script Commit  : 693f4 (Branch: main)
                        Current XO Commit     : a1b2c (Branch: master)
                        Master XO Commit      : d4e5f (Branch: master)
                        Current Node          : v24.15.0

  ──────────────────────────────────────────────────────────────────────────────────

  ▸ [✓] Install Xen Orchestra                   [ ] Reconfigure Xen Orchestra
    [ ] Update Xen Orchestra                    [ ] Rebuild Xen Orchestra
    [ ] Rename Sample-xo-config.cfg             [ ] Edit xo-config.cfg
    [ ] Install XO Proxy                        [ ]  Restore Backup
                         [ ] Adjust Xen Orchestra Memory Allocation

  ──────────────────────────────────────────────────────────────────────────────────

  Selected: 1

  ↑↓←→ Navigate   SPACE Select/Deselect   ENTER Confirm   Q Quit
Select one or more items with SPACE, then press ENTER to run them.
git clone https://github.com/acebmxer/install_xen_orchestra.git
cd install_xen_orchestra
cp sample-xo-config.cfg xo-config.cfg
nano xo-config.cfg   # edit to your liking
./install-xen-orchestra.sh
Do NOT run with
sudo. Run as a normal user with sudo privileges — the script handlessudointernally.
If xo-config.cfg doesn't exist, it will be created automatically from the sample.
All settings live in xo-config.cfg. See sample-xo-config.cfg for full documentation of every option.
Key settings:
| Option | Default | Description |
|---|---|---|
HTTP_PORT |
80 | HTTP port |
HTTPS_PORT |
443 | HTTPS port |
INSTALL_DIR |
/opt/xen-orchestra | Installation directory |
GIT_BRANCH |
master | Git branch or tag |
NODE_VERSION |
24.15.0 | Node.js version |
SERVICE_USER |
xo-service | Service user (set to root for VMware V2V import) |
BACKUP_KEEP |
5 | Number of backups to retain |
BIND_ADDRESS |
0.0.0.0 | Bind address |
REVERSE_PROXY_TRUST |
false | Trust X-Forwarded headers from proxy IP |
Note on
BACKUP_KEEProtation: The retention policy only applies to backups created by the current version of the script. Backups made by older script versions may use a different naming convention and will not be counted or pruned by the rotation logic. If you are upgrading from an older version, manually review your backup directory (BACKUP_DIRin config, default/var/lib/xo-backups) and remove any legacy-named archives you no longer need.
After installation, access the web interface at https://your-server-ip.
admin@admin.netadminChange the default password immediately after first login.
Before applying an update, the script queries the Xen Orchestra REST API for active tasks (e.g. running backups, VM exports). If any are found, the update is aborted to prevent data loss or corruption.
Only admin-level XO accounts can access the REST API. Authentication is resolved in priority order:
| Priority | Method | Source |
|---|---|---|
| 1 | Auth token | XO_TASK_CHECK_TOKEN in xo-config.cfg |
| 2 | Credentials | XO_TASK_CHECK_USER / XO_TASK_CHECK_PASS in xo-config.cfg |
| 3 | Interactive | Prompted at runtime (press Enter to skip) |
It is recommended to create a dedicated XO web UI account solely for the task check (e.g. task-checker@local.net). This account:
You are free to use any admin account you choose, but a dedicated account is the safest approach.
Tokens are more secure than storing a password — they can be revoked independently and expire after 30 days by default.
curl -X POST -u 'task-checker@local.net:yourpassword' \
  https://localhost/rest/v0/users/me/authentication_tokens -k
id field from the responsexo-config.cfg:XO_TASK_CHECK_TOKEN=UlTBEnFeL12XocK-7Qx-DKvOYbPn0eG7Z2oMvOniNjg
Alternatively, store the account credentials directly:
XO_TASK_CHECK_USER=task-checker@local.net
XO_TASK_CHECK_PASS=changeme
If neither token nor credentials are configured, the script will prompt interactively during each update.
| Variable | Description |
|---|---|
XO_DEBUG=1 |
Enable debug mode (set -x) |
XO_NO_SELF_UPDATE=1 |
Skip automatic script self-update |
Check service logs:
sudo journalctl -u xo-server -n 50
If the build is broken, rebuild (takes a backup first):
./install-xen-orchestra.sh --rebuild
The Yarn build is memory-intensive. On hosts with less than 2 GB RAM the Node.js process can be killed by the kernel OOM killer mid-build, leaving an incomplete install.
Add or increase swap to give the build room:
sudo fallocate -l 2G /swapfile
sudo chmod 600 /swapfile
sudo mkswap /swapfile
sudo swapon /swapfile
Re-run the install or --rebuild after the swap is active. To make it permanent across reboots, add /swapfile none swap sw 0 0 to /etc/fstab.
On hosts without internet access (or with strict egress firewall rules) the NodeSource repository setup script fails because it cannot reach keyserver.ubuntu.com or deb.nodesource.com.
Option A — pre-download and import the key manually, then copy the .deb/.rpm packages to the host.
Option B — set NODE_VERSION to a specific patch version (e.g. 24.15.0) in xo-config.cfg. The script will then download a pre-built binary directly from nodejs.org instead of using the NodeSource package repository.
git reports "dubious ownership" and exitsRecent versions of Git refuse to operate on a repository owned by a different user than the one running the command. This can happen when sudo is used inconsistently or when the install directory was created by root but the script is run as a normal user.
Fix it by resetting ownership to match your SERVICE_USER:
sudo chown -R xo-service:xo-service /opt/xen-orchestra
Replace xo-service with the value of SERVICE_USER in xo-config.cfg. Re-running the script afterwards will resolve the rest.
On SELinux-enforcing systems the xo-server service may fail to bind ports or access network resources. Check for AVC denials:
sudo ausearch -m avc -ts recent | grep xo-server
If denials are present, generate and apply a local policy module:
sudo ausearch -m avc -ts recent | audit2allow -M xo-server-local
sudo semodule -i xo-server-local.pp
Alternatively, set the service to permissive mode while investigating:
sudo semanage permissive -a xo_server_t
audit2allow and semanage are provided by the policycoreutils-python-utils package on RHEL/Rocky/Alma.
This project is licensed under the MIT License. Xen Orchestra itself is licensed under AGPL-3.0.
Found root cause.... Forehead slap moment. NBD was not enable on the nics in the pool.
Version 0.2.0 has been release - https://github.com/acebmxer/install_xen_orchestra/blob/main/CHANGELOG.md
Last changes has been about 1 month ago. I have been using it daily, mostly on Ubuntu server but have done some basic test on the other distros that it installs and you can log in with the default credentials. Just need some more feedback from other users, who would be willing to try the project out.
Also some other useful projects I have been working on
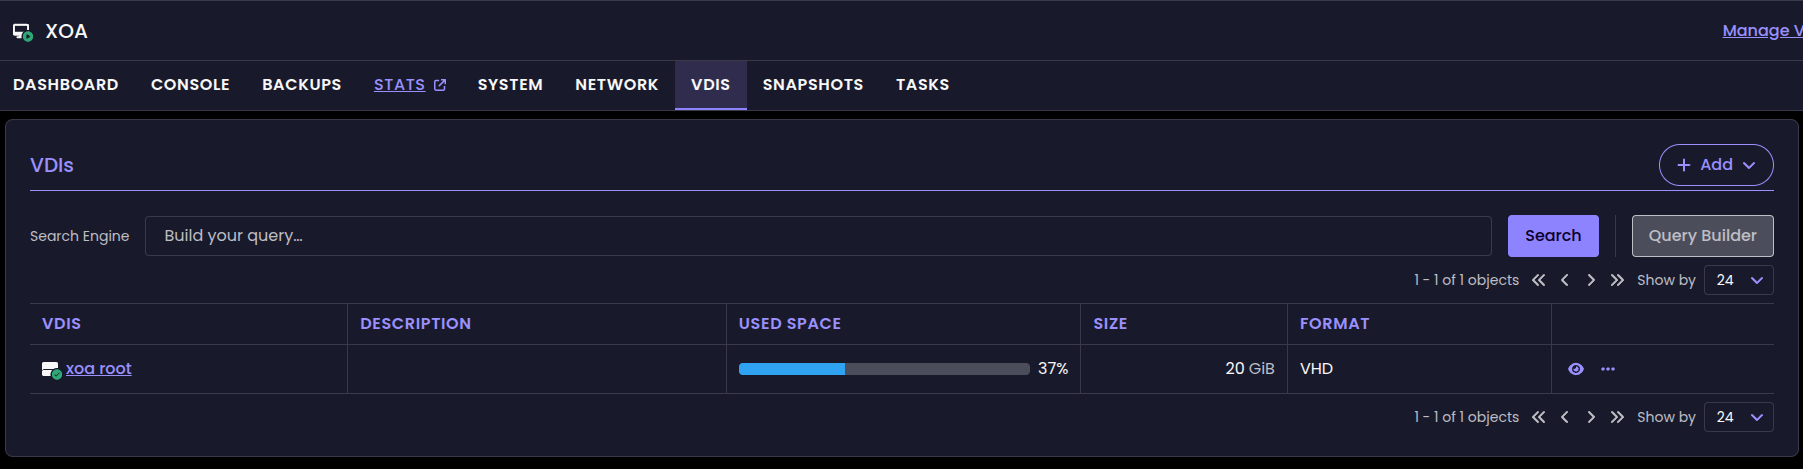
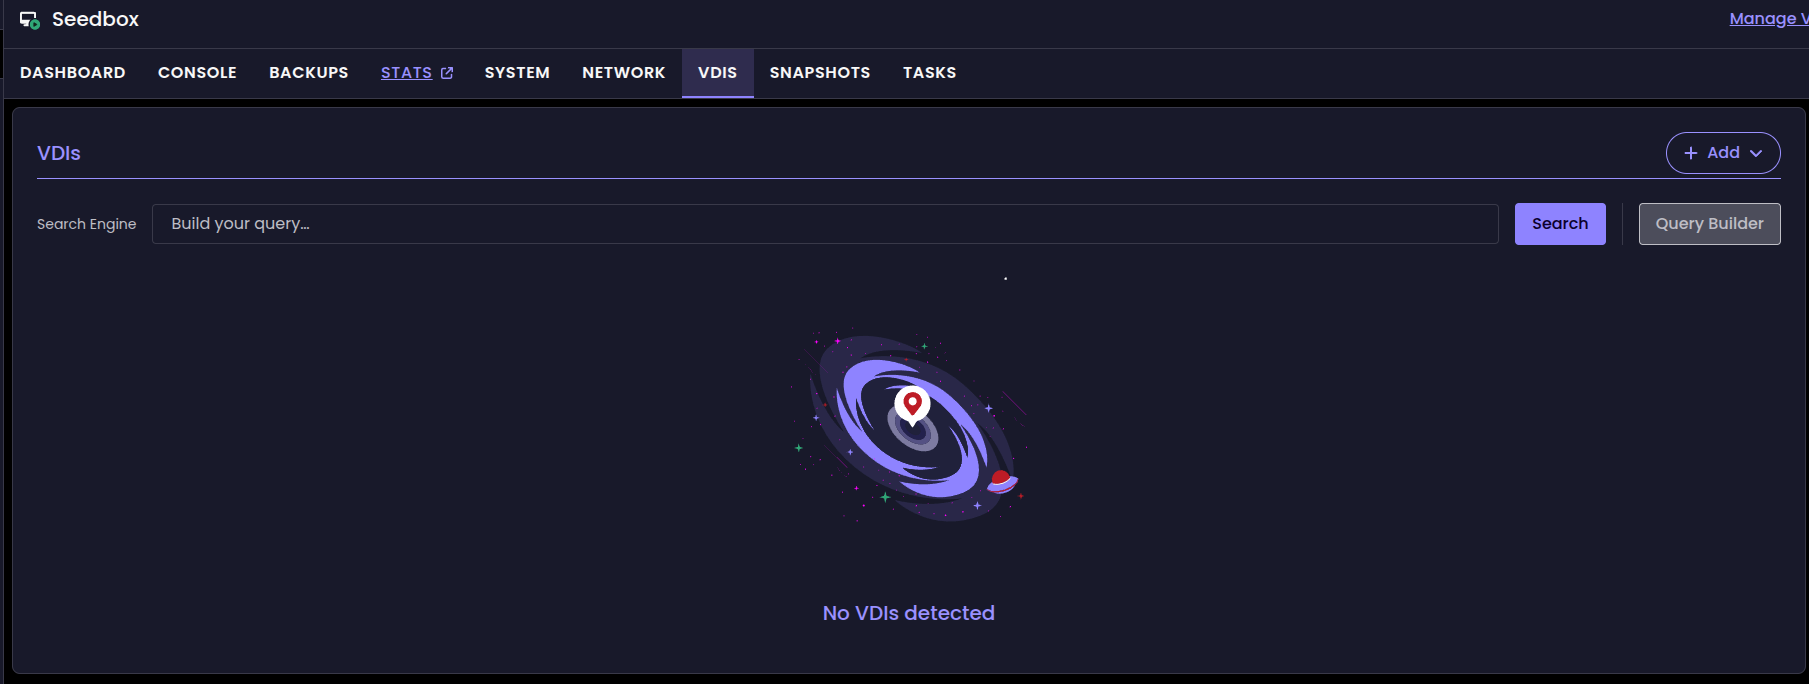
Not sure when this issue start but it is persistent on latest commit. I can either click between vms and/or refreshing the same page will allow the vdi to be show or not. Pictures show different vm's but that was jsut a quick way of getting the different visuals.

Can confirm cloud-init images does not allow you adjust disk size in v6 but does in v5 ui.
I think the main issue is on cloud-init images you can not select a pre-configured custom config templates to apply to the cloud-init image in v6.
This is true on v5 you have to select a config before you can incrase the disk size.
So if i set VMs to Best-effort or disabled for HA i get not enough memory.
@pkgw Do you have Twinstore configured and/or HA enabled? If no I will continue my issues at the twinstore post.
If i set to restart i get this....
host.setMaintenanceMode
{
  "id": "35233210-4e37-4703-9bf6-9e8a9c24df9f",
  "maintenance": true
}
{
  "code": "HA_OPERATION_WOULD_BREAK_FAILOVER_PLAN",
  "params": [],
  "call": {
    "duration": 5,
    "method": "host.disable",
    "params": [
      "* session id *",
      "OpaqueRef:d9bd976f-445c-8244-1b56-879f446efc12"
    ]
  },
  "message": "HA_OPERATION_WOULD_BREAK_FAILOVER_PLAN()",
  "name": "XapiError",
  "stack": "XapiError: HA_OPERATION_WOULD_BREAK_FAILOVER_PLAN()
    at XapiError.wrap (file:///opt/xen-orchestra/packages/xen-api/_XapiError.mjs:16:12)
    at file:///opt/xen-orchestra/packages/xen-api/transports/json-rpc.mjs:38:21
    at runNextTicks (node:internal/process/task_queues:65:5)
    at processImmediate (node:internal/timers:472:9)"
}
No VM had HA set. All were set to disabled. Just set all running vms to best effort and still error.
host.setMaintenanceMode
{
  "id": "35233210-4e37-4703-9bf6-9e8a9c24df9f",
  "maintenance": true
}
{
  "code": "HOST_NOT_ENOUGH_FREE_MEMORY",
  "params": [
    "OpaqueRef:9ada2e57-1c8a-acb8-3637-df6819b64aca"
  ],
  "task": {
    "uuid": "a73ffab2-ef34-7daa-8f26-0bb0c5769559",
    "name_label": "Async.host.evacuate",
    "name_description": "",
    "allowed_operations": [],
    "current_operations": {},
    "created": "20260710T16:42:09Z",
    "finished": "20260710T16:42:09Z",
    "status": "failure",
    "resident_on": "OpaqueRef:119546e4-e0fd-adc7-d42a-b17c4efe789d",
    "progress": 1,
    "type": "<none/>",
    "result": "",
    "error_info": [
      "HOST_NOT_ENOUGH_FREE_MEMORY",
      "OpaqueRef:9ada2e57-1c8a-acb8-3637-df6819b64aca"
    ],
    "other_config": {},
    "subtask_of": "OpaqueRef:NULL",
    "subtasks": [],
    "backtrace": "(((process xapi)(filename ocaml/xapi/xapi_host.ml)(line 629))((process xapi)(filename hashtbl.ml)(line 159))((process xapi)(filename hashtbl.ml)(line 165))((process xapi)(filename hashtbl.ml)(line 170))((process xapi)(filename ocaml/xapi/xapi_host.ml)(line 625))((process xapi)(filename ocaml/libs/xapi-stdext/lib/xapi-stdext-pervasives/pervasiveext.ml)(line 24))((process xapi)(filename ocaml/libs/xapi-stdext/lib/xapi-stdext-pervasives/pervasiveext.ml)(line 39))((process xapi)(filename ocaml/xapi/rbac.ml)(line 228))((process xapi)(filename ocaml/xapi/rbac.ml)(line 238))((process xapi)(filename ocaml/xapi/server_helpers.ml)(line 78)))"
  },
  "message": "HOST_NOT_ENOUGH_FREE_MEMORY(OpaqueRef:9ada2e57-1c8a-acb8-3637-df6819b64aca)",
  "name": "XapiError",
  "stack": "XapiError: HOST_NOT_ENOUGH_FREE_MEMORY(OpaqueRef:9ada2e57-1c8a-acb8-3637-df6819b64aca)
    at XapiError.wrap (file:///opt/xen-orchestra/packages/xen-api/_XapiError.mjs:16:12)
    at default (file:///opt/xen-orchestra/packages/xen-api/_getTaskResult.mjs:13:29)
    at Xapi._addRecordToCache (file:///opt/xen-orchestra/packages/xen-api/index.mjs:1078:24)
    at file:///opt/xen-orchestra/packages/xen-api/index.mjs:1112:14
    at Array.forEach (<anonymous>)
    at Xapi._processEvents (file:///opt/xen-orchestra/packages/xen-api/index.mjs:1102:12)
    at Xapi._watchEvents (file:///opt/xen-orchestra/packages/xen-api/index.mjs:1275:14)"
}
@acebmxer Do you have VMs that aren't configured for HA? Does it work if you temporarily disable HA?
yes disabling HA did work. Note HA was setup via Twinstore. I currently do not have a vm on that SR.
after manually migrate vms off host i was able to put host into maintenance mode to apply updates.
Edit after both host updated still not able to put host into maintenance mode...
host.setMaintenanceMode
{
  "id": "c1372ec6-3651-4481-808b-34293e53e144",
  "maintenance": true
}
{
  "code": "HOST_NOT_ENOUGH_FREE_MEMORY",
  "params": [
    "OpaqueRef:9ada2e57-1c8a-acb8-3637-df6819b64aca"
  ],
  "task": {
    "uuid": "ad526091-5706-3e6b-a544-b7f84a5cfdb0",
    "name_label": "Async.host.evacuate",
    "name_description": "",
    "allowed_operations": [],
    "current_operations": {},
    "created": "20260710T15:43:17Z",
    "finished": "20260710T15:43:17Z",
    "status": "failure",
    "resident_on": "OpaqueRef:119546e4-e0fd-adc7-d42a-b17c4efe789d",
    "progress": 1,
    "type": "<none/>",
    "result": "",
    "error_info": [
      "HOST_NOT_ENOUGH_FREE_MEMORY",
      "OpaqueRef:9ada2e57-1c8a-acb8-3637-df6819b64aca"
    ],
    "other_config": {},
    "subtask_of": "OpaqueRef:NULL",
    "subtasks": [],
    "backtrace": "(((process xapi)(filename ocaml/xapi/xapi_host.ml)(line 629))((process xapi)(filename hashtbl.ml)(line 159))((process xapi)(filename hashtbl.ml)(line 165))((process xapi)(filename hashtbl.ml)(line 170))((process xapi)(filename ocaml/xapi/xapi_host.ml)(line 625))((process xapi)(filename ocaml/libs/xapi-stdext/lib/xapi-stdext-pervasives/pervasiveext.ml)(line 24))((process xapi)(filename ocaml/libs/xapi-stdext/lib/xapi-stdext-pervasives/pervasiveext.ml)(line 39))((process xapi)(filename ocaml/xapi/rbac.ml)(line 228))((process xapi)(filename ocaml/xapi/rbac.ml)(line 238))((process xapi)(filename ocaml/xapi/server_helpers.ml)(line 78)))"
  },
  "message": "HOST_NOT_ENOUGH_FREE_MEMORY(OpaqueRef:9ada2e57-1c8a-acb8-3637-df6819b64aca)",
  "name": "XapiError",
  "stack": "XapiError: HOST_NOT_ENOUGH_FREE_MEMORY(OpaqueRef:9ada2e57-1c8a-acb8-3637-df6819b64aca)
    at XapiError.wrap (file:///opt/xen-orchestra/packages/xen-api/_XapiError.mjs:16:12)
    at default (file:///opt/xen-orchestra/packages/xen-api/_getTaskResult.mjs:13:29)
    at Xapi._addRecordToCache (file:///opt/xen-orchestra/packages/xen-api/index.mjs:1078:24)
    at file:///opt/xen-orchestra/packages/xen-api/index.mjs:1112:14
    at Array.forEach (<anonymous>)
    at Xapi._processEvents (file:///opt/xen-orchestra/packages/xen-api/index.mjs:1102:12)
    at Xapi._watchEvents (file:///opt/xen-orchestra/packages/xen-api/index.mjs:1275:14)"
}
Possible error with Twinstore enabled HA?
Just tried to apply update. Unable to put master host into maintenance mode - not enough memory...
https://xcp-ng.org/forum/post/106814
Edit - Updated both host after manually migrating the vms. Also noticed when i thought i was updating the master host first it might not have been.
With Twinstore installed and enabled HA was also enabled. After first host came back on line i looked at the pool advanced settings and saw host 2 was master not host 1.
Both host have been updated and rebooted. @olivierlambert would this change post master from one host to the other? XO did loose access to the VMs while the first host rebooted. So i am alittle confused...
Once host 2 came back online pool master is switched back to host 1 again...
will look for any other odd things.
Think i am facing this issue now. Just tried to put master host into maintance mode to apply latest 8.3 updates and getting the error.
host.setMaintenanceMode
{
  "id": "c1372ec6-3651-4481-808b-34293e53e144",
  "maintenance": true
}
{
  "code": "HOST_NOT_ENOUGH_FREE_MEMORY",
  "params": [
    "OpaqueRef:1571e2f7-c235-dc10-d766-8883ddd99fd0"
  ],
  "task": {
    "uuid": "631dc2d9-7598-8ce6-5dd0-558342eb7d1f",
    "name_label": "Async.host.evacuate",
    "name_description": "",
    "allowed_operations": [],
    "current_operations": {},
    "created": "20260710T15:20:03Z",
    "finished": "20260710T15:20:03Z",
    "status": "failure",
    "resident_on": "OpaqueRef:119546e4-e0fd-adc7-d42a-b17c4efe789d",
    "progress": 1,
    "type": "<none/>",
    "result": "",
    "error_info": [
      "HOST_NOT_ENOUGH_FREE_MEMORY",
      "OpaqueRef:1571e2f7-c235-dc10-d766-8883ddd99fd0"
    ],
    "other_config": {},
    "subtask_of": "OpaqueRef:NULL",
    "subtasks": [],
    "backtrace": "(((process xapi)(filename ocaml/xapi/xapi_host.ml)(line 629))((process xapi)(filename hashtbl.ml)(line 159))((process xapi)(filename hashtbl.ml)(line 165))((process xapi)(filename hashtbl.ml)(line 170))((process xapi)(filename ocaml/xapi/xapi_host.ml)(line 625))((process xapi)(filename ocaml/libs/xapi-stdext/lib/xapi-stdext-pervasives/pervasiveext.ml)(line 24))((process xapi)(filename ocaml/libs/xapi-stdext/lib/xapi-stdext-pervasives/pervasiveext.ml)(line 39))((process xapi)(filename ocaml/xapi/rbac.ml)(line 228))((process xapi)(filename ocaml/xapi/rbac.ml)(line 238))((process xapi)(filename ocaml/xapi/server_helpers.ml)(line 78)))"
  },
  "message": "HOST_NOT_ENOUGH_FREE_MEMORY(OpaqueRef:1571e2f7-c235-dc10-d766-8883ddd99fd0)",
  "name": "XapiError",
  "stack": "XapiError: HOST_NOT_ENOUGH_FREE_MEMORY(OpaqueRef:1571e2f7-c235-dc10-d766-8883ddd99fd0)
    at XapiError.wrap (file:///opt/xen-orchestra/packages/xen-api/_XapiError.mjs:16:12)
    at default (file:///opt/xen-orchestra/packages/xen-api/_getTaskResult.mjs:13:29)
    at Xapi._addRecordToCache (file:///opt/xen-orchestra/packages/xen-api/index.mjs:1078:24)
    at file:///opt/xen-orchestra/packages/xen-api/index.mjs:1112:14
    at Array.forEach (<anonymous>)
    at Xapi._processEvents (file:///opt/xen-orchestra/packages/xen-api/index.mjs:1102:12)
    at Xapi._watchEvents (file:///opt/xen-orchestra/packages/xen-api/index.mjs:1275:14)"
}
Found root cause.... Forehead slap moment. NBD was not enable on the nics in the pool.