Created cloud config, but can't select it when creating a new VM.
-
@olivierlambert Seems like the cloud init config that gets run is the one under:
/var/lib/cloud/seed/nocloud-net/user-dataHave checked all the different logs and there is nothing about the custom cloud-init config that I selected during VM creation using XenOrchestra.
-
@olivierlambert - I was trying Debian cloud template for XenServer with Debian 10, the installation process mostly works except 'dpkg-reconfigure cloud-init' does not bring up data source selection window. I also read XO Cloudinit guide which talks about openstack vs nocloud config drive, however I have tried the defaults and cloud config tab, but the VM does not pick up the cloud init settings, not sure if I should start a new topic or not but having similar issue.
-
Please try with our Debian template in XO Hub.
-
@olivierlambert I wish, the community edition does not have hub support I believe.
-
You can try with XOA Free

-
@olivierlambert I will certainly try that, however I wanted to customize it for k8s cluster, so was wondering if the old guide need updating if at all.
-
If we can find exactly why, yes we could improve/fix it

-
@olivierlambert - ok, I will continue troubleshooting, the guide is pretty basic, i.e. install plain vanilla debian and install couldinit so was not sure what could go wrong.
-
Partition ID for Cloudinit is the first step to check.
apt-get install cloud-init cloud-initramfs-growrootdiff /usr/lib/cloud-init/ds-identify.ORIGINAL /usr/lib/cloud-init/ds-identify 236a237,238 > LABEL_FATBOOT=*) label="${line#LABEL_FATBOOT=}"; > labels="${labels}${line#LABEL_FATBOOT=}${delim}";; /etc/cloud/cloud.cfgssh_deletekeys: true datasource_list: [ ConfigDrive, None ] datasource: ConfigDrive: dsmode: local -
@olivierlambert just tried to go through the process again from what the example gave. Included the extra lines you mentioned above for the datasource. But it is still not seeing any of the custom cloud init settings that I configured.
Is the template VM somehow badly configured? Is there anything on here that is outdated: https://xen-orchestra.com/blog/centos-cloud-template-for-xenserver/
I'll continue debugging this issue but would be nice to have a guide on how to make cloud init work. Seems like there is something either missing or not working on the current guide (maybe XO bug?).
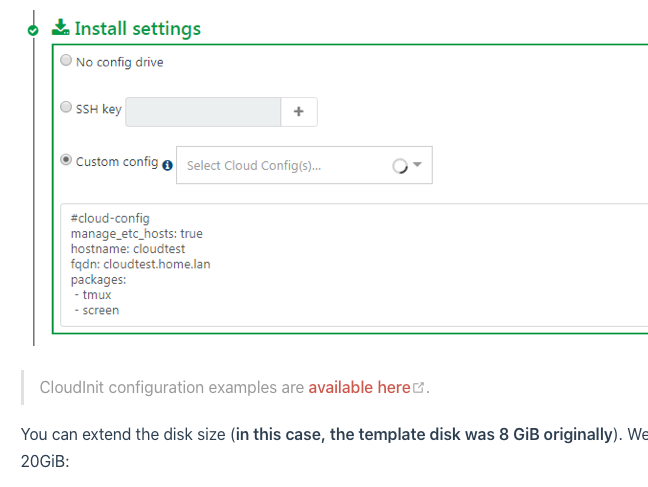
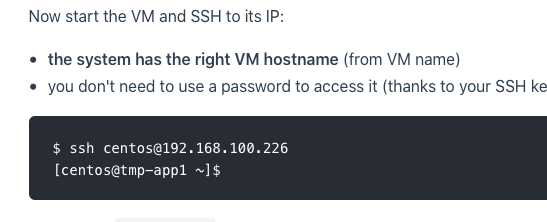
Looking at the docs again, seems like the cloud-init config didn't really work:
Hostname is set to: cloudtest

Result (host name is not correct )

-
@eperez539 this guide wont work, this is what I did, installed XOA, created the VM from HUB, modified it and converted again to the template.
-
@geek-baba Thanks, do you happen to have some steps on the additional changes you made to the VM before converting in to the template?
-
@eperez539 just install anything you want, for example I added docker and kubernetes and converted it to template and now when I create new VM it retains everything.
-
@geek-baba oh ok, so are you bypassing cloud init altogether? How do you handle the network config? I was hoping to at least setup network + ssh key and then I could mange with Ansible after that.
Initially tried using Terraform with XO, but this cloud init issue may be the problem why I was having an issue getting them to work together.
-
no I am not bypassing the cloudinit, I am using a working template that have local cloud config that I was not able to get it working on my own. if you use the template, you would see 2 drives under disk like below.

-
@olivierlambert said in Created cloud config, but can't select it when creating a new VM.:
your VM to understand why it doesn't fetch your config.
There was a an update to cloud-init recently and it broke the template I've been using to deploy our VMs. What's i've noticed so far is that it overwrites the network configuration files for centos in /etc/sysconfig/network-scripts/ifcfg-eth0. I got around that issue by adding the network: configuration: ignore to the cloud.cfg file..
I then figured maybe it's time to update my template, so I went ahead and did just that using the same guide found here.
Once the VM starts it also fails to load the config drive automatically, so I'm thinking the documentation will need to get some sort of refresh .. Once I figure it out, I can show what worked for me here if no one else figured it out first.
-
Keep us posted please

-
@olivierlambert
I got it working by applying the diff you posted above. I edited the ds-identity file and added the fatboot label. I then added the datasource entries to cloud.cfg.I converted to a template and 1st bootup it updated automaticaly and ran everything I had already setup in the cloud.cfg.
I would say that the blog post from December 2015 or the wiki needs to be updated with that new information. Also worth mentioning is that unless a network configuration is specified in the cloud.cfg file you need to add this snippet at the bottom so that any future customization of the network interfaces doesn't get wiped up by cloud-init:
network: config: disabled -
@MrMike could you please post the changes to ds-identity file? Also, I don't see the
/usr/lib/cloud-init/ds-identify.ORIGINALfile. Is this something that gets created after the new VM is created? -
You need to add the following 2 lines to /usr/lib/cloud-init/ds-identify at or around line 245 if your file is different than mine.
         LABEL_FATBOOT=*) label="${line#LABEL_FATBOOT=}";
                           labels="${labels}${line#LABEL_FATBOOT=}${delim}";;
The file diff /usr/lib/cloud-init/ds-identify.ORIGINAL is just a backup of the original file. You should do the same in case you need to roll back changes one day.
Here's the end result in my file (see line 245 where I added the above):
    236     for line in "$@"; do
    237         case "${line}" in
    238             DEVNAME=*)
    239                 [ -n "$dev" -a "$ftype" = "iso9660" ] &&
    240                     isodevs="${isodevs},${dev}=$label"
    241                 ftype=""; dev=""; label="";
    242                 dev=${line#DEVNAME=};;
    243             LABEL=*) label="${line#LABEL=}";
    244                      labels="${labels}${line#LABEL=}${delim}";;
    245             LABEL_FATBOOT=*) label="${line#LABEL_FATBOOT=}";
    246                              labels="${labels}${line#LABEL_FATBOOT=}${delim}";;
    247             TYPE=*) ftype=${line#TYPE=};;
    248             UUID=*) uuids="${uuids}${line#UUID=}$delim";;
    249         esac
    250     done


