
# Networking
XCP-ng is using Open vSwitch as its core, and supports various features from it.
TIP
Even if one NIC can be enough for your host, having a dedicated NIC for storage will be really important to get consistent performances (especially if you use shared storage like iSCSI or NFS).
# Concepts
This section describes the general concepts of networking in XCP-ng.
XCP-ng creates a network for each physical NIC during installation. When you add a server to a pool, the default networks are merged. This is meant to be sure that all physical NICs with the same device name are attached to the same network, authorizing seamless VM flexibility on any host of the pool.
Typically, you add a network to create a new external network (bridge), set up a new VLAN using an existing NIC, or create a NIC bond.
You can configure four different types of networks in XCP-ng:
- Default Networks have an association with a physical network interface. Those are also called "External networks" provide a bridge between a virtual machine and the physical network interface connected to the network. External networks enable a virtual machine to connect to resources available through the server’s physical NIC.
- Bonded networks create a bond between two or more NICs to create a single, high-performing channel between the virtual machine and the network.
- Global Private Networks extend the single server private network concept to allow VMs on different pools and/or hosts to communicate with each other by using the XOA SDN controller.
# Network objects
This section uses three types of server-side software objects to represent networking entities. These objects are:
- A PIF, which represents a physical NIC on a host. PIF objects have a name and description, a UUID, the parameters of the NIC they represent, and the network and server they are connected to.
- A VIF, which represents a virtual NIC on a virtual machine. VIF objects have a name and description, a UUID, and the network and VM they are connected to.
- A network, which is a virtual Ethernet switch on a host. Network objects have a name and description, a UUID, and the collection of VIFs and PIFs connected to them.
xe CLI, Xen Orchestra or XCP-ng center allow you to configure networking options. You can control the NIC used for management operations, and create advanced networking features such as VLANs and NIC bonds.
# Networks
Each XCP-ng server has one or more networks, which are virtual Ethernet switches. Networks that are not associated with a PIF are considered internal. Internal networks can be used to provide connectivity only between VMs on a given XCP-ng server, with no connection to the outside world. Networks associated with a PIF are considered external. External networks provide a bridge between VIFs and the PIF connected to the network, enabling connectivity to resources available through the PIF’s NIC.
# VLANs
VLANs, as defined by the IEEE 802.1Q standard, allow a single physical network to support multiple logical networks. XCP-ng hosts support VLANs in multiple ways.
# VLANs for VMs
Switch ports configured as 802.1Q VLAN trunk ports can be used with XCP-ng VLAN features to connect guest virtual network interfaces (VIFs) to specific VLANs. In this case, XCP-ng server performs the VLAN tagging/untagging functions for the guest, which is unaware of any VLAN configuration.
XCP-ng VLANs are represented by additional PIF objects representing VLAN interfaces corresponding to a specified VLAN tag. You can connect XCP-ng networks to the PIF representing the physical NIC to see all traffic on the NIC. Alternatively, connect networks to a PIF representing a VLAN to see only the traffic with the specified VLAN tag. You can also connect a network such that it only sees the native VLAN traffic, by attaching it to VLAN 0.
To use VLANs for your network logical isolation, it's really easy. You'll create a new network with a VLAN ID, and all virtual interfaces created on this network will transparently have traffic tagged in this VLAN. No need to configure anything inside your VM.
First step, go in Xen Orchestra menu, "New" then "Network":
Then, select a pool where you want to create this network, and fill what's required, like physical interface selection, name and description and also VLAN number:

Finally, click on "Create network":

That's it!
# Bonds
It's same as previous section, just check the "Bonded Network" and select multiple PIFs in the Interface selector. You can either use VLANs or not, it doesn't matter!
# Manage physical NICs
# Add a new NIC
After physically installing a new NIC, you'll need to run a xe pif-scan command on the host to get this NIC added as an available PIF.
xe pif-scan host-uuid=<HOST UUID>
Check new NIC by UUID:
xe pif-list
Plug new NIC:
xe pif-plug uuid=<NIC UUID>
# Renaming NICs
In a pool, all NICs across your hosts should match up exactly. So if your management is NIC 0 and your 10Gbit storage interface is NIC 4 on host 1, it should be the same on host 2.
If for some reason the NIC order between hosts doesn't match up, you can fix it with the interface-rename command.
TIP
These commands are meant to be done on non-active interfaces. Typically this will be done directly after install, before even joining a pool.
interface-rename --help
This will display all available options.
interface-rename --list
This will display the current interface mapping/assignments.
Interfaces you wish to rename need to be downed first:
ifconfig eth4 down
ifconfig eth8 down
The most common use will be an update statement like the following:
interface-rename --update eth4=00:24:81:80:19:63 eth8=00:24:81:7f:cf:8b
This example will set the mac-address for eth4 & eth8, switching them in the process.
The XAPI database needs the old PIFs removed. First list your PIFs for the affected NICs:
xe pif-list
xe pif-forget uuid=<uuid of eth4>
xe pif-forget uuid=<uuid of eth8>
Reboot the host to apply these settings.
The interfaces by their new names need to be re-enabled:
ifconfig eth4 up
ifconfig eth8 up
The new interfaces need to be introduced to the PIF database:
xe host-list
Make note of the host uuid. Then introduce the interfaces:
xe pif-introduce device=eth4 host-uuid=<host uuid> mac=<mac>
xe pif-introduce device=eth8 host-uuid=<host uuid> mac=<mac>
By renaming/updating interfaces like this, you can assure all your hosts have the same interface order.
# Remove a physical NIC
Before removing it, just be sure to remove its associated networks, so it won't cause trouble. Then, shutdown, remove the NIC and finally boot. After the boot, do a xe pif-forget uuid=<OLD PIF UUID> to get rid of the object record.
# SDN controller
An SDN controller is provided by a Xen Orchestra plugin. Thanks to that, you can enjoy advanced network features.
# GRE/VXLAN tunnels
Private network (using tunnels) are very handy when you want to access resources in a secure manner, that are not in the same physical network.
So we want a network that is:
- reachable by all the hosts in a pool or even between different pools!
- unreachable by anything outside the network
- reactive when the pool changes (new host, host ejected,
PIFunplugged etc):
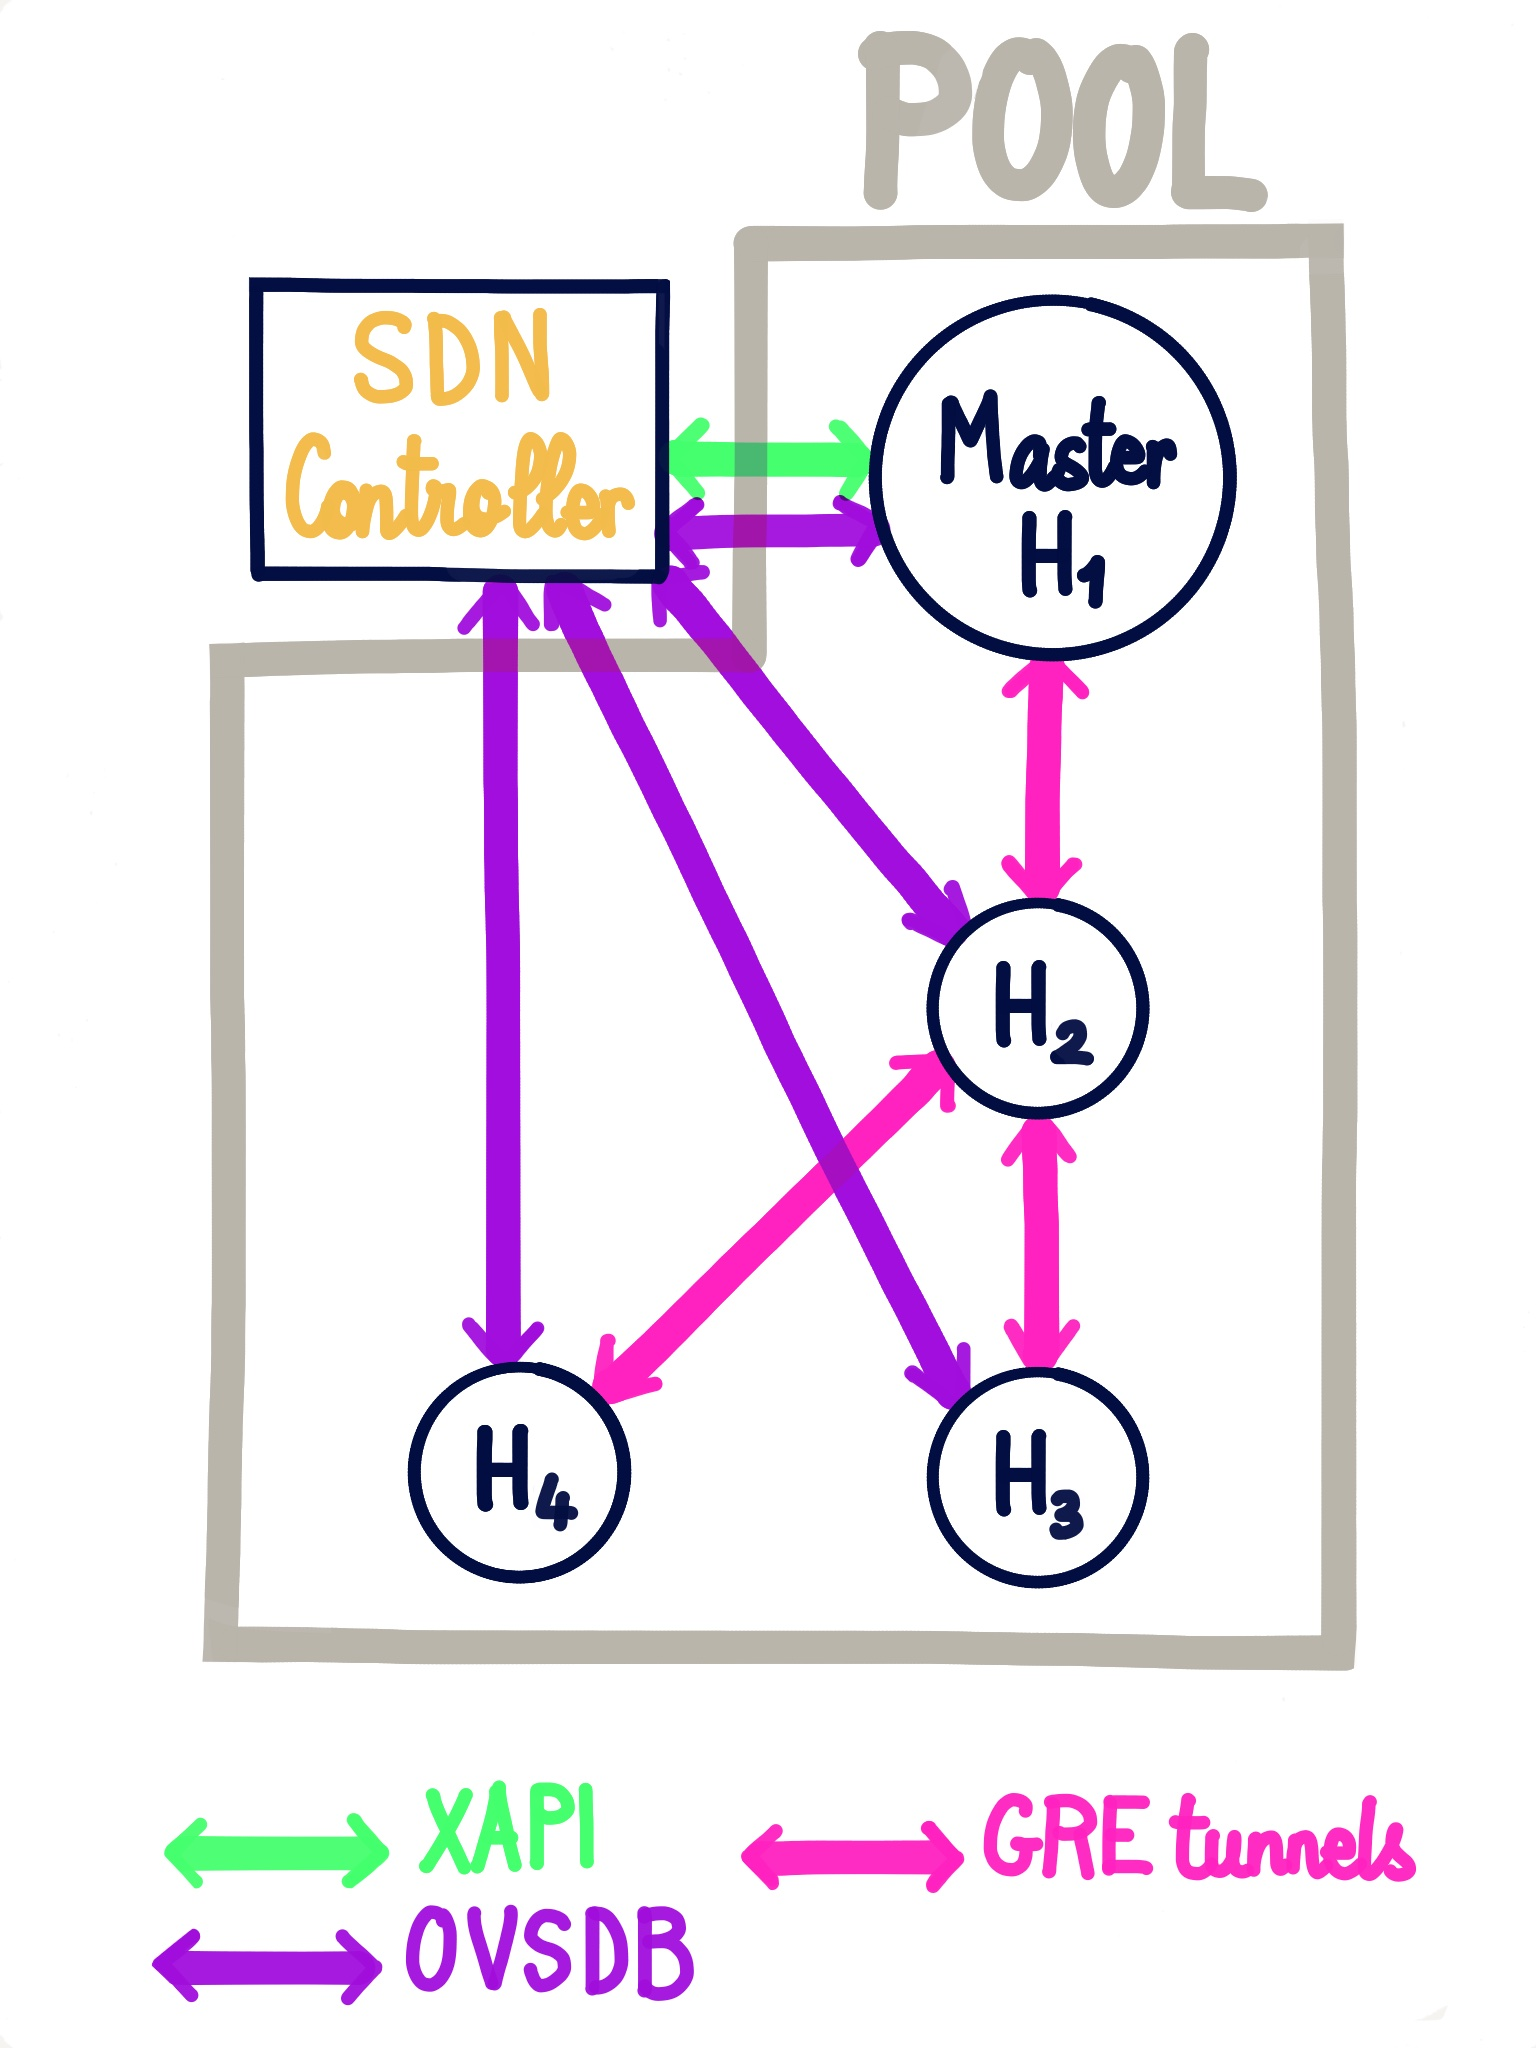
That's exactly what you can have thanks to XO SDN controller (here via GRE tunnels):
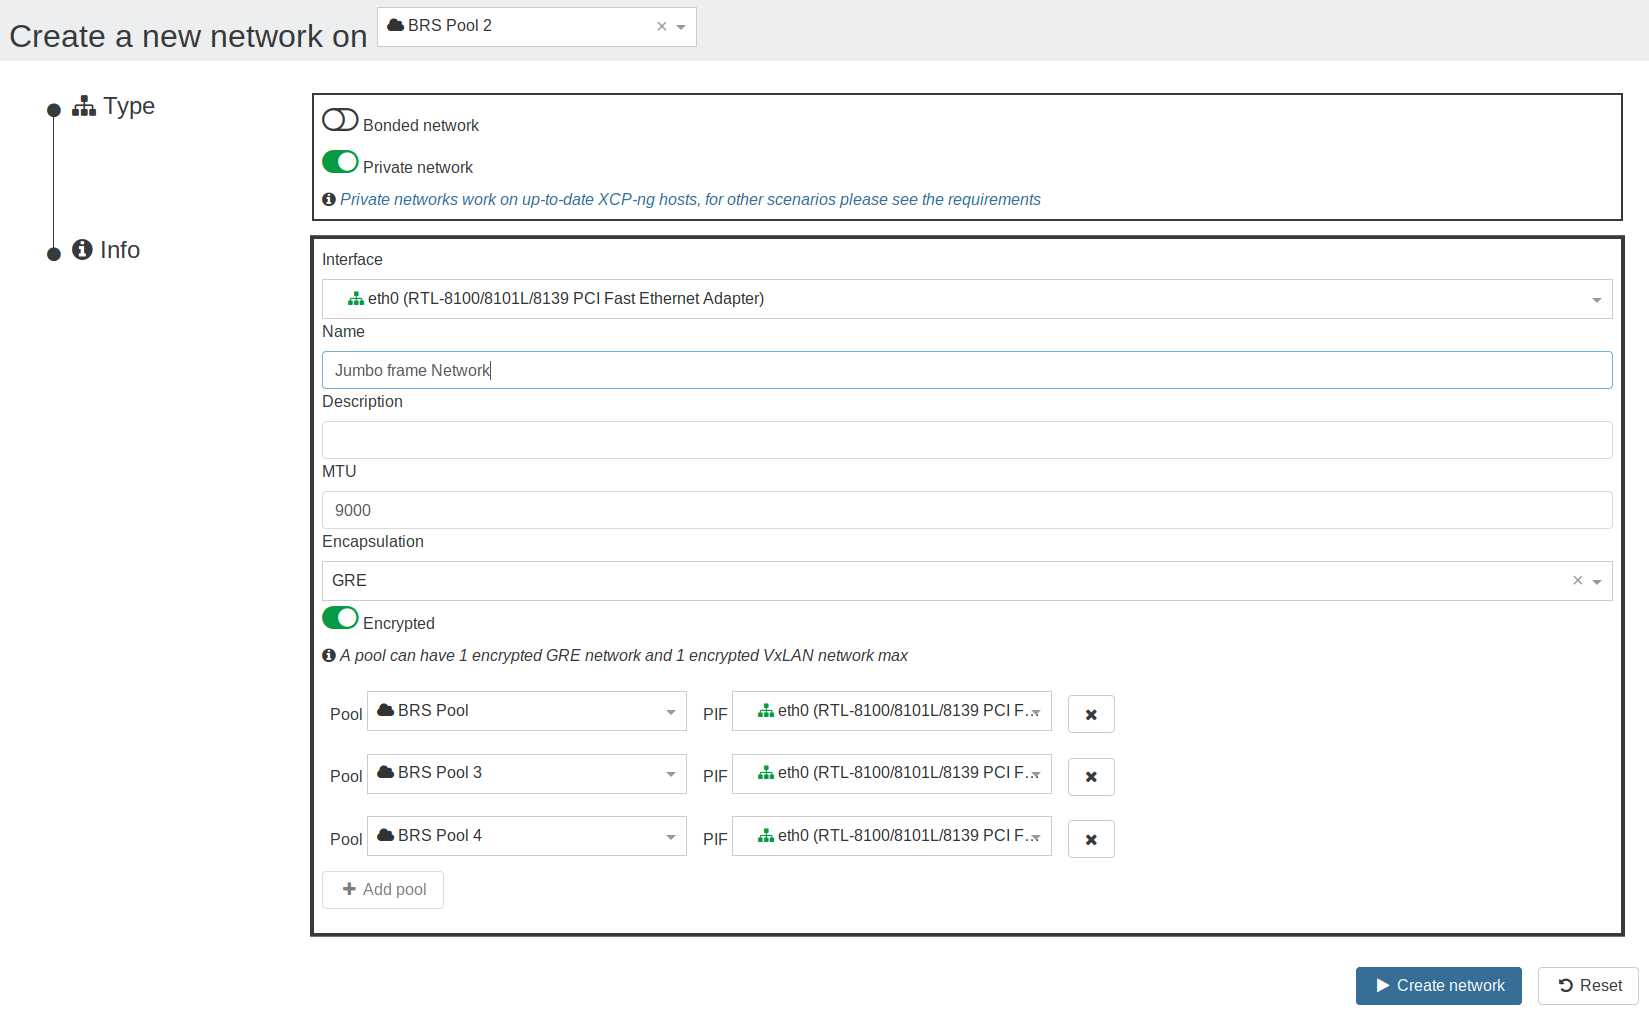
To create a private network, go in Xen Orchestra, New/Network and select "Private Network":
# Encryption
To be able to encrypt the networks, openvswitch-ipsec package must be installed on all the hosts:
yum install openvswitch-ipsec --enablerepo=xcp-ng-testingsystemctl enable ipsecsystemctl enable openvswitch-ipsecsystemctl start ipsecsystemctl start openvswitch-ipsec
More information available on XO official documentation for SDN controller (opens new window).
# OpenFlow rules
TIP
This feature is coming very soon!
# Common errors
# TLS connection issue
The error would look like this:
Client network socket disconnected before secure TLS connection was established
It means the TLS certificate, used to identify a SDN controller, on the host doesn't match the one of the plugin, to solve it:
- unload the SDN Controller plugin
- in plugin config, set
override-certsoption to on (it will allow the plugin to uninstall the existing certificate before installing its own) - load the plugin
The issue should be fixed.
# Static routes
Sometimes you need to add extra routes to an XCP-ng host. It can be done manually with an ip route add 10.88.0.0/14 via 10.88.113.193 (for example). But it won't persist after a reboot.
To properly create persistent static routes, first create your xen network interface as usual. If you already have this network created previously, just get its UUID with an xe network-list. You're looking for the interface you have a management IP on typically, something like xapi0 or xapi1 for example. If you're not sure which one it is, you can run ifconfig and find the interface name that has the IP address this static route traffic will be exiting. Then get that interfaces UUID using the previous xe network-list command.
Now insert the UUID in the below example command. Also change the IPs to what you need, using the following format: <network>/<netmask>/gateway IP>. For example, our previous ip route add 10.88.0.0/14 via 10.88.113.193 will be translated into:
xe network-param-set uuid=<network UUID> other-config:static-routes=10.88.0.0/14/10.88.113.193
TIP
You must restart the toolstack on the host for the new route to be added!
You can check the result with a route -n afterwards to see if the route is now present. If you must add multiple static routes, it must be in one command, and the routes separated by commas. For example, to add both 10.88.0.0/14 via 10.88.113.193 and 10.0.0.0/24 via 192.168.1.1, you would use this:
xe network-param-set uuid=<network UUID> other-config:static-routes=10.88.0.0/14/10.88.113.193,10.0.0.0/24/192.168.1.1
# Removing static routes
To remove static routes you have added, stick the same network UUID from before in the below command:
xe network-param-remove uuid=<network UUID> param-key=static-routes param-name=other-config
A toolstack restart is needed as before.
TIP
XAPI might not remove the already-installed route until the host is rebooted. If you need to remove it ASAP, you can use ip route del 10.88.0.0/14 via 10.88.113.193. Check that it's gone with route -n.
# Full mesh network
This page describes how to configure a three node meshed network (see Wikipedia (opens new window)) which is a very cheap approach to create a 3 node HA cluster, that can be used to host a Ceph cluster, or similar clustered solutions that require 3 nodes in order to operate with full high-availability.
Meshed network requires no physical network switches, the 3 physical nodes are interlinked with each other using multiple network interfaces.
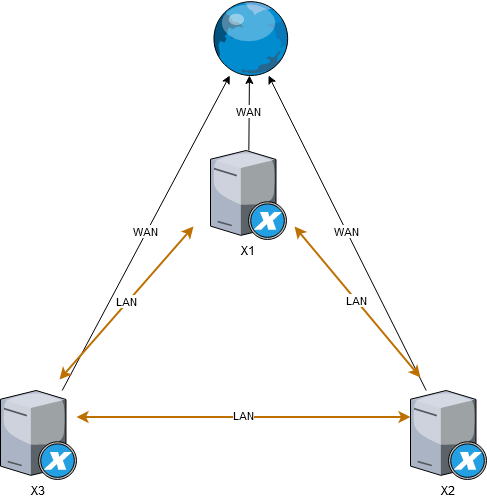
Example with 3 nodes that each has 3 NIC, 1 is for WAN connection and 2 are used to interlink with remaining 2 nodes:
WARNING
Right now only known-to-work option is to use bridge network backend, but hopefully in future it should be possible to setup meshed network using Open vSwitch as well (should you know how, please update this wiki)
# Using bridge backend
WARNING
These steps will require reboot of all 3 nodes multiple times. They will also require you to use bridge network backend instead of Open vSwitch, which will result in loss of some functionality and is not commercially supported
# Switch to bridge mode on all nodes
SSH to dom0
# on dom0 on each hypervisor as root user
xe-switch-network-backend bridge
# reboot the hypervisor
reboot
# Create a bond on all nodes
In XCP-ng Center go to NICs tab and create a bond, selecting eth1 and eth2 as bond devices, leave all options as default
# Reconfigure the bond device to broadcast mode
Again, ssh to dom0 on all nodes and execute
xe pif-list
# Example output
uuid ( RO)                  : f1580a37-6726-6479-d399-635e2cb719b6
                device ( RO): eth2
    currently-attached ( RO): false
                  VLAN ( RO): -1
          network-uuid ( RO): b33187c0-b231-0c69-6ee9-3ad2dcefa6f8


uuid ( RO)                  : 63abf866-890d-79bb-d276-8a50e8e4a94b
                device ( RO): eth0
    currently-attached ( RO): true
                  VLAN ( RO): -1
          network-uuid ( RO): 7404e9f7-7dfe-b666-d6f2-1fe9886498cd


uuid ( RO)                  : 77826c83-4b60-8137-c00f-3027d89b86b2
                device ( RO): eth1
    currently-attached ( RO): false
                  VLAN ( RO): -1
          network-uuid ( RO): ae9847e4-5587-2e61-4870-365143837aba


uuid ( RO)                  : 65380308-0c53-3d96-f564-06a724a792be
                device ( RO): bond0
    currently-attached ( RO): true
                  VLAN ( RO): -1
          network-uuid ( RO): b7e4d20b-64ed-bf38-c56f-4d740b579005

# Replace the UUID with the bond ID and execute following command
xe pif-param-set uuid=65380308-0c53-3d96-f564-06a724a792be other-config:bond-mode=broadcast
reboot
# Configure the interface in XCP-ng center
Go to tab Networking, rename bond1+2 device to something more memorable such as "MeshLAN", then add IP to all dom0 VMs to test it out, click "Configure" in IP configuration, add IP address and insert following addresses (you can use different addresses and range if you prefer to):
On each node respectively
- 192.168.10.1
- 192.168.10.2
- 192.168.10.3
Netmask: 255.255.255.0 Gateway: leave empty
Now SSH to each dom0 and try if you can ping all 3 IP addresses. If you can, you successfully created a meshed network. This network is going to provide interconnection between all 3 nodes and even if some node die, connectivity between remaining 2 nodes will remain operational.
This setup will save you costs of 2 network switches you would otherwise have to purchase and use instead to achieve HA connectivity.
# References
- Forum post: https://xcp-ng.org/forum/topic/1897/mesh-network (opens new window)
- Proxmox wiki: https://pve.proxmox.com/wiki/Full_Mesh_Network_for_Ceph_Server (opens new window)
# DNS Search Domains
When XCP-ng is configured for static IP configuration there are no DNS search domains added. It is possible to add search domains into /etc/resolv.conf, however those won't persist across reboots. Use xe pif-param-set to add search domains that should persist across reboots.
- First identify the PIF used as management interface.
# xe pif-list host-name-label=xcpng-srv01 management=true
uuid ( RO)                  : 76608ca2-e099-9344-af36-5b63c0022913
                device ( RO): bond0
    currently-attached ( RO): true
                  VLAN ( RO): -1
          network-uuid ( RO): cc966455-d5f8-0257-04a7-d3d7c671636b
- Take note of the
uuidfield and pass that toxe pif-param-set
# xe pif-param-set uuid=76608ca2-e099-9344-af36-5b63c0022913 other-config:domain=searchdomain1.com,searchdomain2.com,searchdomain3.com
This procedure has to be done for all hosts in the same pool.
# Network Troubleshooting
# Network corruption
Disabling TX offload might help to diagnose NIC issues:
xe pif-param-set uuid=<PIF UUID> other-config:ethtool-tx=off
# Disabling FCoE
If you are using bonds on FCoE capable devices, it's preferable to disable it entirely:
systemctl stop fcoe
systemctl stop xs-fcoe
systemctl disable fcoe
systemctl disable xs-fcoe
See https://github.com/xcp-ng/xcp/issues/138 (opens new window).
# Emergency Network Reset
Incorrect networking settings can cause loss of network connectivity. When there is no network connectivity, XCP-ng host can become inaccessible through Xen Orchestra or remote SSH. Emergency Network Reset provides a simple mechanism to recover and reset a host’s networking.
The Emergency network reset feature is available from the CLI using the xe-reset-networking command, and within the Network and Management Interface section of xsconsole.
Incorrect settings that cause a loss of network connectivity include renaming network interfaces, creating bonds or VLANs, or mistakes when changing the management interface. For example, typing the wrong IP address. You may also want to run this utility in the following scenarios:
WARNING
If a Pool master or host in a resource pool is unable to contact with other hosts.
Use the xe-reset-networking utility only in an emergency because it deletes the configuration for all PIFs, bonds, VLANs, and tunnels associated with the host. Guest Networks and VIFs are preserved. As part of this utility, VMs are shut down forcefully. Before running this command, cleanly shut down the VMs where possible. Before you apply a reset, you can change the management interface and specify which IP configuration, DHCP, or Static can be used.
If the pool master requires a network reset, reset the network on the pool master first before applying a network reset on pool members. Apply the network reset on all remaining hosts in the pool to ensure that the pool’s networking configuration is homogeneous. Network homogeneity is an important factor for live migration.
TIP
- If the pool master’s IP address (the management interface) changes as a result of a network reset or xe host-management-reconfigure, apply the network reset command to other hosts in the pool. This is to ensure that the pool members can reconnect to the Pool Master on its new IP address. In this situation, the IP address of the Pool Master must be specified.
- Network reset is NOT supported when High Availability is enabled. To reset network configuration in this scenario, you must first manually disable high availability, and then run the network reset command.
# Verifying the network reset
After you specify the configuration mode to be used after the network reset, xsconsole and the CLI display settings that will be applied after host reboot. It is a final chance to modify before applying the emergency network reset command. After restart, the new network configuration can be verified in Xen Orchestra and xsconsole. In Xen Orchestra, with the host selected, select the Networking tab to see the new network configuration. The Network and Management Interface section in xsconsole display this information.
# SR-IOV
TO have SR-IOV enabled, you need:
- SR-IOV / ASPM compatible mainboard
- SR-IOV compatible CPU
- SR-IOV compatible network card
- SR-IOV compatible drivers for XCP-ng
WARNING
You can't live migrate a VM with SR-IOV enabled. Use it only if you really need it!
# Setup
- enable SR-IOV in your BIOS
- enable ASPM (seem to be needed acording to https://www.juniper.net/documentation/en_US/contrail3.1/topics/concept/sriov-with-vrouter-vnc.html and https://www.supermicro.com/support/faqs/faq.cfm?faq=26448)
- enable SR-IOV in your network card firmware
Then, you can enable and configure it with xe CLI:
xe network-create name-label=SRIOV
xe network-sriov-create network-uuid=<network_uuid> pif-uuid=<physical_pif_uuid>
xe network-sriov-param-list uuid=<SR-IOV Network_uuid>
The last command will tell you if you need to reboot or not.
Assign the SR-IOV network to your VM:
xe vif-create device=<device index> mac=<vf_mac_address> network-uuid=<sriov_network> vm-uuid=<vm_uuid>
If you want to disable it:
xe network-sriov-destroy uuid=<network_sriov_uuid>
TIP
You can read a Citrix guide here: https://support.citrix.com/article/CTX235044 (opens new window)
# Intel i218/i219 slow speed
With kernel version 4.15 a fix in the e1000e driver has been introduced (opens new window). However, this fix slightly slows down DMA access times to prevent the NIC to hang up on heavy UDP traffic. This impacts the TCP performance. A workaround to regain full transfer speeds, you can turn off TCP segmentation offloading via the following command:
ethtool -K <interface> tso off gso off
There is currently no fix available / announced that allows offloading TCP segmentation to the NIC without sacrificing performance.
TIP
The following error message can be ignored: Cannot get device udp-fragmentation-offload settings: Operation not supported
← Storage Compute & GPU →